Quantcast
Channel: Linux tutorials Archives | Unixmen
Viewing all 1264 articles
Browse latest View live

Configure Linux Clients To Authenticate Using OpenLDAP

$
0
0


This is the second part of our previous tutorial, titled how to install and configure OpenLDAP server on Debian and Ubuntu systems. In this guide let us see how to configure Linux clients to authenticate using OpenLDAP server. I have tested this Guide on Debian 8 desktop and Ubuntu 15.04 desktop, it worked perfectly without any issues. And also, this guide should on other Debian and Ubuntu distributions. If you find any problems, feel free to let me know. I will check and update this tutorial ASAP.

For the purpose of this tutorial, we will be using Debian 8 MATE desktop as LDAP client.

My client system’s details:

  • Operating system: Debian 8 MATE desktop
  • IP Address: 192.168.1.150/24

My LDAP Server’s details:

  • Operating system: Ubuntu 15.04 server
  • IP Address: 192.168.1.100/24

Configure Linux Clients To Authenticate Using OpenLDAP

Here, I am going to split this tutorial into two sections. First, we’ll see how to install LDAP client on Debian 8, and then we’ll see how to configure Debian 8 desktop to authenticate.

1. Install LDAP client

I assume that you’ve had a working LDAP server already. If not, refer the above link to setup OpenLDAP server in Debian and Ubuntu and its derivatives.

Now let us install the required packages in our LDAP client.

Switch to root user:

sudo su

Or

su

Run the following command from your Terminal to install LDAP client packages.

apt-get install libnss-ldap libpam-ldap nscd

During installation, you will be asked a variety of questions. Read them carefully and enter the appropriate values.

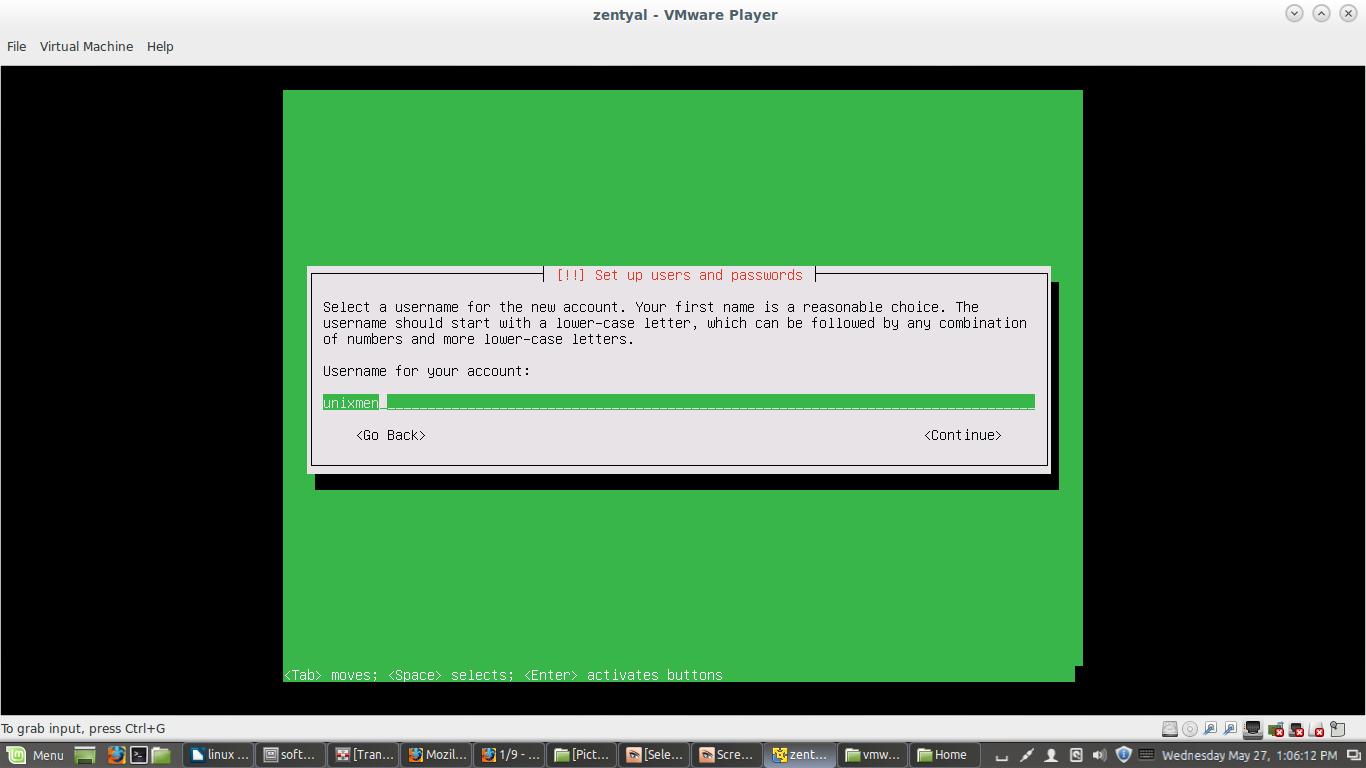
First enter the ldap server IP address as shown in the below screenshot.

sk@debian: ~_001

Note that you should enter LDAP server URI as ldap://ip-address-of-ldapserver/. Using IP address is always recommended to avoid failures when domain name services are unavailable.

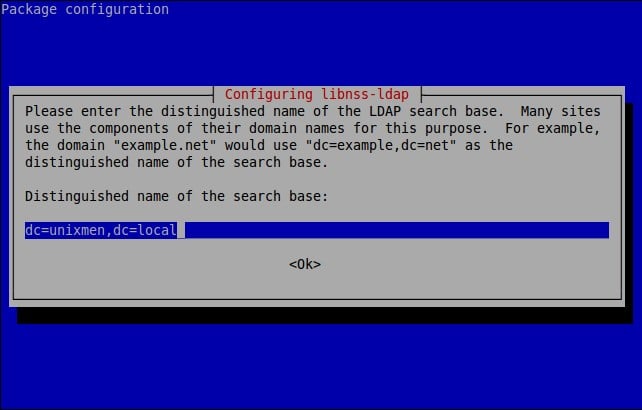
Then enter the distinguished name of the search base. This value should match with your LDAP server’s /etc/phpldaadmin/config.php file values. In my case it’s dc=unixmen, dc=local.

sk@debian: ~_002

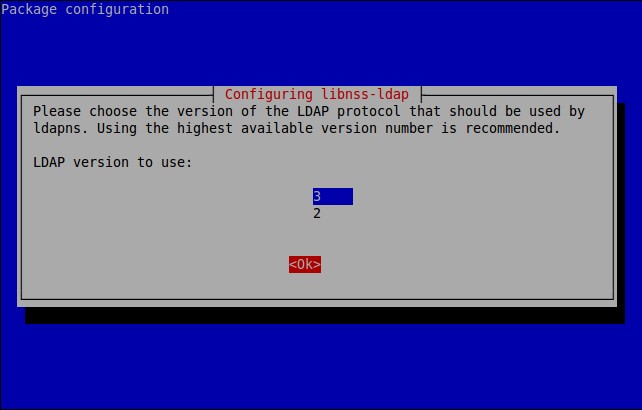
Select Ldap version to use as 3. It is recommended to use highest available version.

sk@debian: ~_003

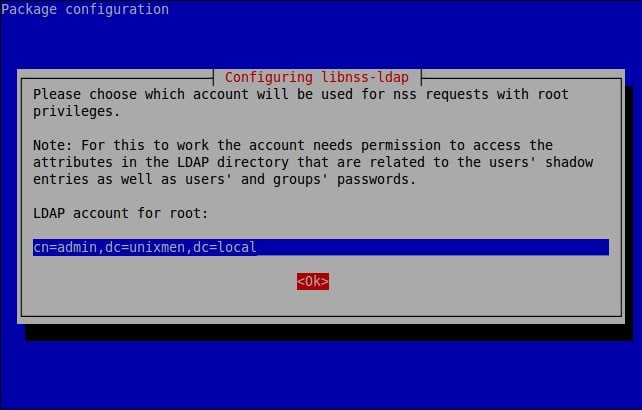
Enter LDAP administrative account details.

In our case, it was: cn=admin, dc=unixmen.com, dc=local.

sk@debian: ~_005

Enter LDAP administrative password:

sk@debian: ~_006

The next window will say that you have to manually edit nsswitch.conf file. Click Ok to continue.

sk@debian: ~_007

Now the libnss-ldap package has been installed. Now, we should enter the same answers for libpam-ldap, i.e the above questions will be repeated for libpam-ldap.

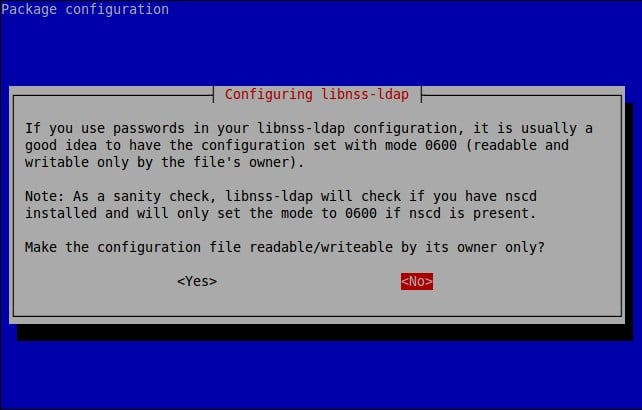
We don’t need to act the client LDAP admin account as local root, hence we will select No.

sk@debian: ~_008

Select No.

sk@debian: ~_009

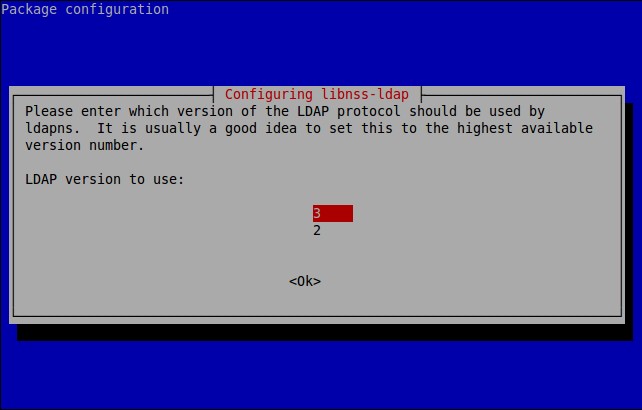
Now, let us reconfigure libnss-ldap to improve debconf configuration by entering the following command:

dpkg-reconfigure libnss-ldap

Make sure that the LDAP server URI is correct.

sk@debian: ~_010

Make sure that the LDAP server search base:

sk@debian: ~_011

LDAP version to use:

sk@debian: ~_012

LDAP database doesn’t require login, hence we select No.

sk@debian: ~_013

Select No.

sk@debian: ~_014

Select No.

sk@debian: ~_015

Finally, Select Ok.

sk@debian: ~_016

That’s it. Now we have installed ldap client packages. 

2. Configure LDAP Client

We must update our client system to look for LDAP server by adjusting their configuration files.

To do so, First edit file /etc/ldap/ldap.conf,

nano /etc/ldap/ldap.conf

Uncomment the following lines and Enter your LDAP server search BASE and URI as shown below.

[...]
BASE    dc=unixmen,dc=local
URI     ldap://192.168.1.100
[...]

Edit file /etc/nsswitch.conf,

nano /etc/nsswitch.conf

Find the following three lines and adjust them as shown below.

[...]
passwd:         compat ldap
group:          compat ldap
shadow:         compat ldap
[...]
netgroup:       ldap
[...]

Now restart nscd service:

systemctl restart nscd

On Ubuntu 14.10/Debian 7 and previous versions:

service nscd restart

PAM Configuration

Now we should verify the PAM configuration. The PAM configuration is modified during libnss-ldap installation. But it is advisable to verify the PAM configuration files as look like below.

Edit file /etc/pam.d/common-auth,

nano /etc/pam.d/common-auth

Make sure this file contains the following lines.

[...]
auth    [success=2 default=ignore]      pam_unix.so nullok_secure try_first_pass
auth    [success=1 default=ignore]      pam_ldap.so use_first_pass
[...]
auth    requisite                       pam_deny.so
[...]
auth    required                        pam_permit.so
[...]

Edit file /etc/pam.d/common-account,

nano /etc/pam.d/common-account
[...]
account [success=2 new_authtok_reqd=done default=ignore]        pam_unix.so
account [success=1 default=ignore]      pam_ldap.so
[...]
account requisite                       pam_deny.so
[...]
account required                        pam_permit.so
[...]

Edit file nano /etc/pam.d/common-password,

nano /etc/pam.d/common-password
[...]
password        [success=2 default=ignore]      pam_unix.so obscure sha512
password        [success=1 user_unknown=ignore default=die]     pam_ldap.so use_authtok try_first_pass
[...]
password        requisite                       pam_deny.so
[...]
password        required                        pam_permit.so
[...]

Edit file /etc/pam.d/common-session,

nano /etc/pam.d/common-session

Add the following line at the bottom.

[...]
session  required                                         pam_mkhomedir.so

The above line will create a HOME directory for LDAP users who does not have home directory when login to LDAP server.

Edit file /etc/pam.d/common-session-noninteractive,

nano /etc/pam.d/common-session-noninteractive
[...]
session [default=1]                     pam_permit.so
[...]
session requisite                       pam_deny.so
[...]
session required                        pam_permit.so
[...]
session required        pam_unix.so
session optional                        pam_ldap.so

Restart nscd service to save changes.

systemctl restart nscd

On Debian 7/Ubuntu 14.10 and lower versions:

service nscd restart

Reboot your client system and try to login with your LDAP user from client system.

Log In To LDAP Server

Now, we have configured our client to be able to log in to our OpenLDAP server. Let us try to login using any ldap users created in the openldap server. Please note that this LDAP user doesn’t exist in the local client system. Don’t be confused.

I have already created a user named “kumar” in my OpenLDAP server. Refer the section Sample Configuration in my previous tutorial.

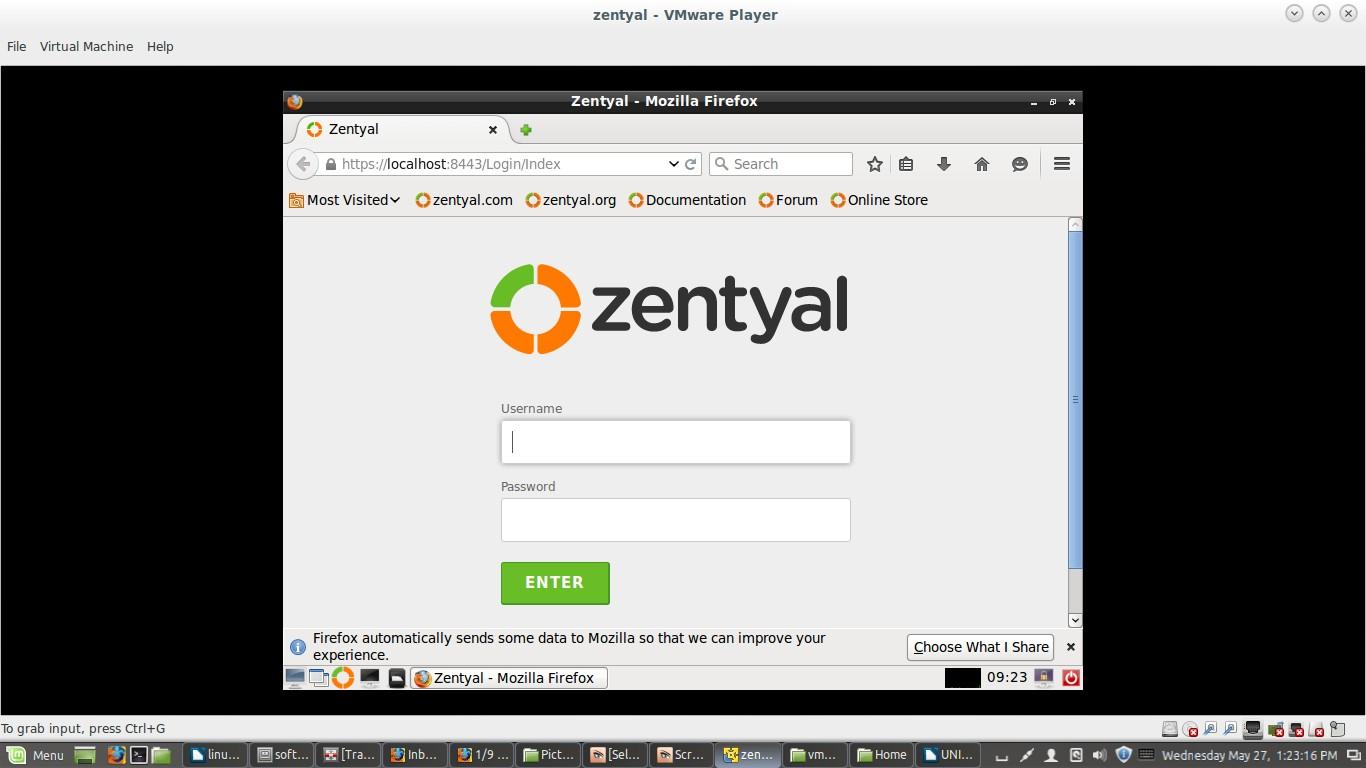
So, now let us login with user “kumar”.

Enter your LDAP user name and password.

Debian 8 Desktop [Running] - Oracle VM VirtualBox_004

Please note that the user named “kumar” is not a local user. We have created this user in our previous guide using phpLDAPAdmin tool..

Congratulations! Now, you will be able to log in to your client system with LDAP user.

Debian 8 Desktop [Running] - Oracle VM VirtualBox_005

Let us check who exactly is this user.

Open Terminal, and run:

whoami

Sample output:

kumar

Selection_006

Run pwd command from the Terminal to know the user’s present working directory:

pwd

Sample output:

/home/users/kumar

Selection_007

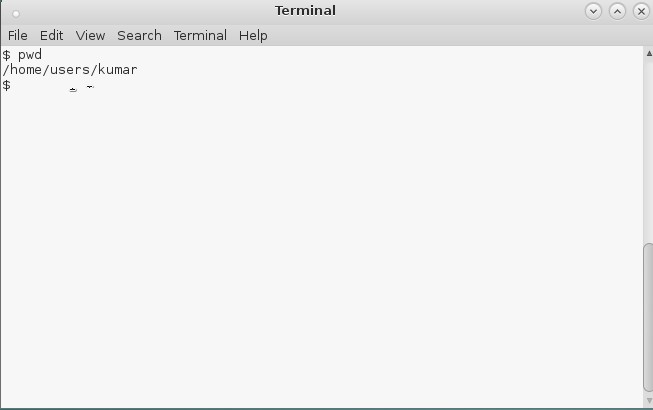
You should see that the home directory you selected for your user on the LDAP server is being used on this machine. It has been created on-demand to serve the LDAP user.

You should now be able to authenticate multiple computers using a centralized LDAP server. Your LDAP users will be allowed to use any of the machines you configure in this way, as long as they have the valid login credentials.

Initially this how-to will look bit difficult, but if you follow the steps carefully you will be able to setup the complete LDAP server/client.

Good Luck!

Reference: Setup OpenLDAP On Debian

---------------------------------------------------------------------
Configure Linux Clients To Authenticate Using OpenLDAP


Gibbon: A Web-based Flexible School Management System

$
0
0


About Gibbon

Gibbon is a free, Open Source, and web-based flexible school management system that can be used to solve real time problems of teachers, students, parents, and educators in different kind of schools. Gibbon allows seamless planing, teaching, and assessment for both teachers and students. It collates every student information, so that every teacher has a clear understanding of each student details such as each student’s attendance, grades, and performance. Based on the results, the teachers can easily understand each student’s ups and downs in each subject, and they can help the students in every possible way.

Be you’re a teacher, student, or parent, Gibbon is an excellent, comprehensive and one-stop-shop efficient tool that makes all information available in one place. Since Gibbon is web-based, the teachers, management persons of the school, and parents can easily and quickly access all student details on the go. Also, It provides easy and timely access to progress and upcoming tasks.

Features

Using Gibbon, the teachers can,

  • Create timetables and lesson plans ;
  • Share lesson plans to students, and parents ;
  • Assign homework ;
  • Review and submit marks of home work and exams to both students and parents ;
  • Maintain attendance of each student ;
  • Send assignments to students ;
  • Send assessment of each student’s to their parents ;
  • Know each student’s personal details, such as address, gender, DOB, Contact no. ;
  • Notify the students or parents about pending fees of every year ;
  • Send periodic performance of student’s performance to their parents ;
  • Create notes outlining both positive and negative student behaviour ;
  • Insert resources directly into lesson plans ;
  • Create list of school activities, functions, programs and let students to participate and sign up online ;
  • Add Learning Area overviews and other reading materials ;
  • Allow students to browse the library ;
  • Allow parents to quickly contact staff based on email addresses ;
  • And many.

Using Gibbon, the management team of a School can,

  • Manage fees, billing schedules and invoices ;
  • Send payment reminders to parents ;
  • Track payments as they arrive ;
  • Generate lists of families who have outstanding payments ;
  • Find the personal details of all employees, staffs, teachers, students, and parents ;
  • Know the students performance ;
  • Know the students grades, attendance, academic performance in all activities ;
  • Know the fee structure of each curriculum ;
  • Fix the fees structure and share them to other management and staffs ;
  • Quickly and easily send messages to staffs, teachers, parents via Email or SMS ;
  • Allow members of the public to apply for school places online ;
  • Reject and approve applications at any time ;
  • And many.

Using Gibbon, the Students can,

  • View their academic performance, grades, marks etc. ;
  • Get lesson plans, home works, assignment from the respective teachers ;
  • View attendance details, and time table of all subjects ;
  • Find various learning materials ;
  • View and participate school events and programs ;
  • View reading materials from school library and teachers ;

The parents can ;

  • View their son/daughter marks ,grades, assignments, assessments, and attendance details ;
  • View and download application forms ;
  • View a particular staff details, such as contact no, Email addresses etc. ;
  • Track their son/daughter’s academic and behavioural records ;
  • And many.

For complete details Gibbon, look at the features page.

Install Gibbon

Prerequisites:

1. Install LAMP Stack

Since, Gibbon is web-based application, we need to setup LAMP or LEMP stack in our Linux server. In this tutorial, let us see how to install and configure Gibbon on CentOS 7 and Ubuntu 15.04 using LAMP stack.

To install LAMP stack on CentOS 7, refer the following link.

For Ubuntu 15.04, refer the following link.

2. PHP Configuration

Next, edit the ‘php.ini’ configuration file:

On CentOS 7:

vi /etc/php.ini

On Ubuntu 15.04:

sudo nano /etc/php5/fpm/php.ini

If you can’t find the location of php.ini, the following command will help to find it.

php -i | grep php.ini

Sample output:

Configuration File (php.ini) Path => /etc
Loaded Configuration File => /etc/php.ini

Add or modify the following lines in php.ini file:

file_uploads = On
allow_url_fopen = On
register_globals = off
magic_quotes_gpc = Off
set max_input_vars = 5000
dispaly_errors = Off
error_reporting = E_ALL & ~E_NOTICE

Save and close the file. Restart Apache service.

On CentOS:

systemctl restart httpd

On Ubuntu:

systemctl restart apache2

3. MySQL Configuration

Create a new MySQL database and MySQL user for Gibbon on your server.

Log in to MySQL prompt using command:

mysql -u root -p

Then, run the following commands marked in bold in the MySQL prompt to create Database and user for Gibbon.

MariaDB [(none)]> CREATE DATABASE gibbondb;
Query OK, 1 row affected (0.00 sec)

MariaDB [(none)]> GRANT ALL PRIVILEGES ON gibbondb.* TO 'gibbonuser'@'localhost' IDENTIFIED BY 'centos';
Query OK, 0 rows affected (0.00 sec)

MariaDB [(none)]> FLUSH PRIVILEGES;
Query OK, 0 rows affected (0.00 sec)

MariaDB [(none)]> exit

Here,

  • gibbondb – MySQL database for Gibbon.
  • gibbonuser – MySQL database user for Gibbon.
  • centos – password of gibbonuser.

Replace the above values with your own.

Download And Install Gibbon

After completing all prerequisites, go to Gibbon download page and get the latest version. As of writing this, the latest version was 9.1.00.

wget https://github.com/GibbonEdu/core/archive/v9.1.00.zip

Extract the zip fiel:

unzip v9.1.00.zip

Move the extracted contents to web root folder.

mv core-9.1.00 /var/www/html/gibbon

Set the proper permission to ‘/var/www/html/gibbon’ directory.

chown apache:apache -R /var/www/html/gibbon/

Make sure Gibbon directory as writable. If not, set it writable with command:

chmod 777 /var/www/html/gibbon/

Setup proper SELinux permission to ‘var/www/html/gibbon’ directory, otherwise you might get ‘403 forbidden’ error.

setsebool -P httpd_enable_homedirs true
chcon -R -t httpd_sys_content_t /var/www/html/gibbon/

Finally. restart apache service.

In CentOS:

systemctl restart httpd

In Ubuntu:

systemctl restart apache2

Starting Gibbon web based installer

Open up your browser and navigate to: http://IP-Address/gibbon. The following screen should appear.

Note: If you can’t access the Gibbon installer page, disable or set permissive mode in SELinux, and try.

Select your System language and Click Submit.

Gibbon Installer - Mozilla Firefox_001

Enter the database information which we have defined in the MySQL configuration section.

Gibbon Installer - Mozilla Firefox_003

In the next screen, enter the User account details, System settings, Organization settings, Country and Timezone details etc.

Gibbon Installer - Mozilla Firefox_004

Congratulations! We have successfully deployed Gibbon. Now, you can access the Gibbon dashboard using: http://ip-address/gibbon.

Enter the user name and its password that we created during the installation.

Unixmen - Gibbon - Mozilla Firefox_006

Here is the Gibbon dashboard.

Unixmen - Gibbon - Mozilla Firefox_007

For complete usage guide, refer the official getting started guide with Gibbon.

Post Installation

After installing Gibbon, we must do the following things to secure the Gibbon installation.

  1. Set permissions of all Gibbon files so they are not publicly writeable (e.g. chmod -Rv 755 /var/www/html/gibbon).
  2. Create folder /uploads and set file permissions for to allow writing by web server.
  3. To improve security and reliability, magic_quotes_gpc should be turned off in php.ini. This is supposed to be deprecated in PHP 5.3, but experience shows sometimes it is better to turn it off anyway.
  4. Turn PHP register_globals off. On shared host, use .htaccess “php_flag register_globals off” to do this
  5. Set PHP to allow <? as well as <?php. Turn short_open_tag on. (This is not required for running the Core as of v8.0.00 or greater. Update your additional modules to the latest version.)
  6. Turn folder browsing off. On shared host, use .htaccess “Options -Indexes”
  7. Set PHP’s max_file_uploads to at least the number of students in a class.
  8. Set PHP’s error to be error_reporting = E_ALL & ~E_NOTICE or less aggressive
  9. Set PHP to allow URLs as files (otherwise Calendar overlay in TT will not work). allow_url_fopen=On
  10. Set PHP’s max_input_vars setting to 5,000 (otherwise Manage Permissions breaks)

Create Virtual Hosts (Optional)

In case, you might want to deploy Gibbon in web main root folder instead of sub-folder, i.e you want the Gibbon URL as www.domain-name.com, not to be www.domain-name/gibbon. What will you do? Very simple, We can do it using virtualhosts. Here is the instructions for both CentOS and Ubuntu.

1. Create a new virtual host file in CentOS

vi /etc/httpd/conf/httpd.conf

Add the following lines:

<VirtualHost *:80>
   ServerAdmin admin@your-domain.com
   DocumentRoot /var/www/html/gibbon/
   ServerName your-domain.com
   ServerAlias www.your-domain.com
   <Directory /var/www/html/gibbon/>
      Options FollowSymLinks
      AllowOverride All
   </Directory>
   ErrorLog /var/log/apache2/your-domain.com-error_log
   CustomLog /var/log/apache2/your-domain.com-access_log common
</VirtualHost>

Restart the Apache web server for the changes to take effect using the following command:

systemctl restart httpd

2. Create a new virtual host file in Ubuntu

Refer the following guide to create Vhost files in Ubuntu and its derivatives.

systemctl restart apache2

Now, Open http://domain.com in your web browser and follow the onscreen instructions as shown in the “Starting Gibbon web based installer” section above.

That’s it. Cheers!!

Reference link: Gibbon Home page

---------------------------------------------------------------------
Gibbon: A Web-based Flexible School Management System

Centmin Mod – A Shell Script To Automatically Deploy LEMP Stack In CentOS

$
0
0


About LEMP Stack

LEMP is a combination of the operating system and open-source software stack. LEMP is acronym of Linux, Nginx(engine-x) HTTP Server, MySQL/MariaDB database, and PHP/Perl/Python. Compared to LAMP stack (Apache, MySQL/MariaDB, perl/php/python), LEMP is light weight, fast, and able to handle much higher load using the same set of hardware. Don’t get me wrong. I won’t say LEMP is better than LAMP stack. It is purely depends on what you want to deploy on your web server.

In this tutorial, let us see to how to setup LEMP stack using CentMin Mod, a shell menu based NGINX installer for CentOS servers.

About Centmin Mod

For those who don’t know, Centmin Mod is a shell menu based auto-installer script for LEMP stack. The shell based menu allows Nginx and PHP version management, upgrading or downgrading Nginx and PHP or setting up Nginx vhosts. At present, Centmin Mod supports CentOS 5.x and 6.x versions only. The testing for CentOS 7.x version is going on.

Centmin Mod script will install the following softwares automatically.

  • Nginx 1.7.12 (https / SPDY SSL + ngx_pagespeed support) ;
  • PHP 5.4.41 (php-fpm) with support for PHP 5.3/5.4/5.5/5.6 ;
  • MariaDB 5.5.43 ;
  • PHP opcode cache: Zend OpCache 7.0.4, APC Cache 3.13, Xcache 3.1.0 ;
  • Memcached Server 1.4.20 and Memcache 3.0.8 PHP Extension ;
  • Libmemcached 1.0.18 and Memcached 2.2.0 PHP Extension (Centmin Mod v1.2.3-eva2000.01+) ;
  • Multi-threaded compression: pigz, pbzip2, lbzip2, plzip, p7zip (optional) ;
  • CSF Firewall.

Centmin Mod Installation

In this tutorial, let us see how to deploy LEMP stack in CentOS 6.6 64bit version using Centmin Mod script.

First of all, update your system

yum update -y

And, Install the following prerequisites too.

yum install bc wget unzip yum-plugin-fastestmirror -y

We can install Centmin Mod in three different methods.

Method 1:

This is the traditional method. Just download the script archive, extract it and run the script using the following command and select menu option 1.

Download latest version of Centmin Mod:

cd /usr/local/src
wget http://centminmod.com/download/centmin-v1.2.3-eva2000.07.zip

Note: DO NOT download to /tmp and run centmin.sh from /tmp as Centmin Mod removes the ability to execute scripts from /tmp as a security precaution. Also the downloaded contents must NOT be deleted or removed as subsequent runs of centmin.sh to use menu options require certain files and scripts in place.

Extract the downloaded zip file using command:

unzip centmin-v1.2.3-eva2000.07.zip

Go to the centmin directory:

cd centmin-v1.2.3mod/

Set execute permissions to the centmin.sh script with command:

chmod +x centmin.sh

Finally, run the script to deploy LEMP stack:

./centmin.sh

You will see the following shell menu based installer. Enter ‘1’ to start install Centmin.

----------------------------
Configure sshd_config
----------------------------
Reloading sshd:                                            [  OK  ]
--------------------------------------------------------
Centmin Mod 1.2.3-eva2000.07 - http://centminmod.com
--------------------------------------------------------
                   Centmin Mod Menu                   
--------------------------------------------------------
1).  Centmin Install
2).  Add Nginx vhost domain
3).  NSD setup domain name DNS
4).  Nginx Upgrade / Downgrade
5).  PHP Upgrade / Downgrade
6).  XCache Re-install
7).  APC Cache Re-install
8).  XCache Install
9).  APC Cache Install
10). Memcached Server Re-install
11). MariaDB 5.2, 5.5, 10 Upgrade Sub-Menu
12). Zend OpCache Install/Re-install
13). Install ioping.sh vbtechsupport.com/1239/
14). SELinux disable
15). Install/Re-install ImageMagick PHP Extension
16). Change SSHD Port Number
17). Multi-thread compression: pigz,pbzip2,lbzip2,p7zip etc
18). Suhosin PHP Extension install
19). Install FFMPEG and FFMPEG PHP Extension
20). NSD Re-install
21). Update - Nginx + PHP-FPM + Siege
22). Exit
--------------------------------------------------------
Enter option [ 1 - 22 ] 1

The Centmin Mod will disable SELinux to reduce the complexity during installation.

---------------------------------------------------------------
SELINUX linux detected
---------------------------------------------------------------
disabling SELINUX...
will require a server reboot before running initial install
SELINUX disabled, please reboot server and rerun install

Reboot your server now.

reboot

After logging in to the Server, go to the Centmin Mod folder, and run the script again.

cd centmin-v1.2.3mod/
./centmin.sh

Now, select the first option from the menu to continue installing centmin..

Method 2:

Second method, from unattended CLI command line via SSH commandfrom within download zip files extracted directory:

./centmin.sh install

Method 3:

Third method, from one liner CLI install via SSH command below which basically invokes the ./centmin.sh install method via curl:

curl -sL http://centminmod.com/installer.sh | bash

The last two CLI command line methods are great for 100% unattended Centmin Mod installs .

In this tutorial, I used the third method, and it’s worked well as expected.

After running the script, the following screen will appear. Sit back and grab a cup of coffee. Centmin Mod script will automatically add the necessary repositories and install LEMP stack. This will take few minutes depending upon your Internet connection and server configuration.

root@server:~-centmin-v1.2.3mod_001

root@server:~-centmin-v1.2.3mod_002

That’s it. LEMP stack has been successfully deployed now.

Finally, you may get the output like below.

*************************************************
* Centmin Mod install completed....
*************************************************

*************************************************
*  Setup memcached_*.php admin page ...
*************************************************

Setup Memcached Server Admin Login Details for /usr/local/nginx/html/memcache_26636.php
current memcached username: memcacheuser
current memcached password: memcachepass
*************************************************
Memcached Server Admin Login: /usr/local/nginx/html/memcache_26636.php
new memcached username: memadmin810f8efcf2
new memcached password: decc4a2cd82cad64f458ccfc
*************************************************
*************************************************
* memcache_26636.php admin page installed
*************************************************

*************************************************
* MariaDB Security Setup
*************************************************

-------------------------------------------------------
MySQL root user password set
MySQL root user added to /root/.my.cnf
-------------------------------------------------------
MySQL root password: npxV05nrsiRebzqM
-------------------------------------------------------
*************************************************
* MariaDB Security Setup Completed
*************************************************

--------------------------------------------------------
Please bookmark:
--------------------------------------------------------
###############################################################
* Getting Started Guide - http://centminmod.com/getstarted.html
* Find the latest Centmin Mod version - http://centminmod.com
* Centmin Mod FAQ - http://centminmod.com/faq.html
* Change Log - http://centminmod.com/changelog.html 
* Google+ Page latest news http://centminmod.com/gpage
* Community Forums https://community.centminmod.com (signup)
###############################################################
# Cheap VPS Hosting at Digitalocean 
# https://www.digitalocean.com/?refcode=c1cb367108e8
###############################################################

ccache stats:
cache directory                     /home/.ccache
cache hit (direct)                   778
cache hit (preprocessed)             306
cache miss                          3435
called for link                      235
called for preprocessing             244
compile failed                        55
preprocessor error                    62
bad compiler arguments                54
unsupported source language           78
autoconf compile/link                612
unsupported compiler option           14
no input file                        170
files in cache                      7169
cache size                         208.4 Mbytes
max cache size                       2.0 Gbytes

Total YUM Time: 1728.033043453 seconds
Total Centmin Mod Install Time: 5182.295676887 seconds

Please note down the MySQL and Memcached login and password details. You may need them later.

From now on you can add virtual hosts, upgrade PHP, MariaDB etc.

Let us check if Nginx is installed correctly. Open the Web browser and navigate to http://ip-address/. You should see the nginx test page.

Test Page for the Nginx HTTP Server - Mozilla Firefox_001

To view the nginx version, run:

nginx -v

Sample output:

nginx version: nginx/1.7.12

Check php version:

php -v

Sample output:

PHP 5.4.41 (cli) (built: May 19 2015 10:12:54) 
Copyright (c) 1997-2014 The PHP Group
Zend Engine v2.4.0, Copyright (c) 1998-2014 Zend Technologies

Check mysql version:

mysql -v

Sample output:

Welcome to the MariaDB monitor.  Commands end with ; or \g.
Your MariaDB connection id is 6
Server version: 5.5.43-MariaDB MariaDB Server

Copyright (c) 2000, 2015, Oracle, MariaDB Corporation Ab and others.

Reading history-file /root/.mysql_history
Type 'help;' or '\h' for help. Type '\c' to clear the current input statement.

MariaDB [(none)]>

Congratulations! LEMP stack is ready to use.

For detailed guide about Centmin Mod, check the getting started with Centmin Mod page.

Updating to latest stable version

Centmin Mod .07 stable over time may get bug fixes or minor updates. So to grab the latest code at least, it’s basically the same as Method 1 instructions above minus the need to run initial install if you are on an existing Centmin Mod .07 stable based server environment and needing to remove the old zip and extracted folder first.

Go to the directory where you downloaded the centmin script and delete it.

cd /usr/local/src
rm -rf centmin*

Then, download the most recent version using command:

wget http://centminmod.com/download/centmin-v1.2.3-eva2000.07.zip

Extract the downloaded zip archive:

unzip centmin-v1.2.3-eva2000.07.zip

Change to the extracted directory:

cd centmin-v1.2.3mod

Finally run the following command to upgrade it.

chmod +x centmin.sh

That’s it. We have successfully deployed LEMP stack using Centmin Mod.

You might want to check other NGINX auto-installer scripts for CentOS.

I don’t like scripts, I want to setup LEMP server step by step myself. How I can do that?

No worries, It is not that difficult!

Refer the following links to setup LEMP stacks manually yourself.

For CentOS:

For Debian/Ubuntu:

For SUSE/openSUSE:

Cheers!!

Reference:

---------------------------------------------------------------------
Centmin Mod – A Shell Script To Automatically Deploy LEMP Stack In CentOS

How To Install And Configure QEMU In Ubuntu

$
0
0


About QEMU

As a Linux enthusiast, I have been testing so many Open Source and Linux applications, and Distros everyday. Mostly, I use Oracle VirtualBox for testing and playing different operating systems. VirtualBox is a popular virtualization tool to deploy or test different kind of distros. We can deploy as many as guest OSs within the host operating using Oracle VirtualBox. Like Oracle Virtualbox, there are many virtualization products available, such as Vmware, openVZ, KVM, Proxmox etc. Today, we will discuss about QEMU.

QEMU is a generic and open source machine emulator and virtualizer. It is free and open source tool that allows users to create and manage Virtual machines inside the host operating system. The resources of the host operating system, such as Hard drive, RAM, Processor, will be divided and shared by the guest operating systems(Virtual machines).

When used as a machine emulator, QEMU can run OSes and programs made for one machine (e.g. an ARM board) on a different machine (e.g. your own PC). By using dynamic translation, it achieves very good performance.

When used as a virtualizer, QEMU achieves near native performances by executing the guest code directly on the host CPU. QEMU supports virtualization when executing under the Xen hypervisor or using the KVM kernel module in Linux. When using KVM, QEMU can virtualize x86, server and embedded PowerPC, and S390 guests.

QEMU has two operating modes:

  • Full system emulation: In this mode, QEMU emulates a full system (for example a PC), including a processor and various peripherals. It can be used to launch different Operating Systems without rebooting the PC or to debug system code.
  • User mode emulation (Linux host only): In this mode, QEMU can launch Linux processes compiled for one CPU on another CPU. For example, it can be used to launch Wine or to ease cross-compilation and cross-debugging.

QEMU can run without a host kernel driver and yet gives acceptable performance.

QEMU will work fine in the following hardware:

  • PC (x86 or x86_64 processor) ;
  • ISA PC (old style PC without PCI bus) ;
  • PREP (PowerPC processor) ;
  • G3 Beige PowerMac (PowerPC processor) ;
  • Mac99 PowerMac (PowerPC processor, in progress) ;
  • Sun4m/Sun4c/Sun4d (32-bit Sparc processor) ;
  • Sun4u/Sun4v (64-bit Sparc processor, in progress) ;
  • Malta board (32-bit and 64-bit MIPS processors) ;
  • MIPS Magnum (64-bit MIPS processor) ;
  • ARM Integrator/CP (ARM) ;
  • ARM Versatile baseboard (ARM) ;
  • ARM RealView Emulation/Platform baseboard (ARM) ;
  • Spitz, Akita, Borzoi, Terrier and Tosa PDAs (PXA270 processor) ;
  • Luminary Micro LM3S811EVB (ARM Cortex-M3) ;
  • Luminary Micro LM3S6965EVB (ARM Cortex-M3) ;
  • Freescale MCF5208EVB (ColdFire V2) ;
  • Arnewsh MCF5206 evaluation board (ColdFire V2) ;
  • Palm Tungsten|E PDA (OMAP310 processor) ;
  • N800 and N810 tablets (OMAP2420 processor) ;
  • MusicPal (MV88W8618 ARM processor) ;
  • Gumstix “Connex” and “Verdex” motherboards (PXA255/270) ;
  • Siemens SX1 smartphone (OMAP310 processor) ;
  • AXIS-Devboard88 (CRISv32 ETRAX-FS) ;
  • Petalogix Spartan 3aDSP1800 MMU ref design (MicroBlaze) ;
  • Avnet LX60/LX110/LX200 boards (Xtensa).

For user emulation, x86 (32 and 64 bit), PowerPC (32 and 64 bit), ARM, MIPS (32 bit only), Sparc (32 and 64 bit), Alpha, ColdFire(m68k), CRISv32 and MicroBlaze CPUs are supported.

1. Install QEMU in Ubuntu

In this let us see how to install and configure QEMU in Ubuntu 14.04 LTS, and how to create and manage virtual machines.

QEMU is available in the default repositories of Ubuntu. So, we can install it with front-end tool Virt Manager using command:

sudo apt-get install qemu-kvm qemu virt-manager virt-viewer libvirt-bin

After installing the above packages, reboot your system.

2. Creating Virtual machines

Now, let us create a new virtual machine. For the purpose of this tutorial, let us create a new Ubuntu 15.04 server.

First create the Virtual hard disk image for the new VM. For example, let us create 20GB size hard disk image.

qemu-img create ubuntu.img 20G

Or you can create the image with the Qemu’s default disk image format ‘qcow2′ using the following command:

qemu-img create -f qcow2 ubuntu.qcow 20G

Then, download the Ubuntu 15.04 server installation image and boot the Virtual machine. I already downloaded the installation image and kept it in my home directory.

To boot the Virtual machine, run:

qemu-system-x86_64 -hda ubuntu.img -boot d -cdrom /home/sk/Soft_Backup/OS\ Images/New/ubuntu-15.04-server-amd64.iso -m 640

For 32bit VM, use:

qemu-system-xi386 -hda ubuntu.img -boot d -cdrom /home/sk/Soft_Backup/OS\ Images/New/ubuntu-15.04-server-i386.iso -m 640

Here, I have allocated 640MB RAM to my guest OS.

When the boot the screen appears, hit Enter key and continue the installation as usual.

QEMU_002

QEMU_003

After the installation is done, the system can be booted with:

qemu -hda ubuntu.img -m 640

That’s it.

Don’t like command line way? Creating and managing VMs from command line might be bit difficult to some user. No worries, we can also create VMs using GUI tool called Virtual Machine Manager(Virt Manager).

3. Create and manage Virtual machines using Virt Manager

Launch Virtual Machine Manager(Virt manager) either from the Menu or Unity Dash. The default Interface of Virt Manager will look like below.

Virtual Machine Manager_001

Now, we will create and install Ubuntu 15.04 desktop virtual machine.

To create a virtual machine, go to File -> New Virtual machine.

Select how would like to install the operating system.

You can install guest OS using local ISO image/CDROM, Network install, PXE server, or importing existing disk images. Also, you can select the guest OS architecture from the Advanced options.

New VM_003

Select the local install media.

New VM_004

Choose the amount of RAM and no of CPUs.

New VM_005

Enter your virtual hard drive size. The default is 8GB.

New VM_006

Enter your guest OS name. And, Select the Network type from the Advanced options. Finally, click Finish.

New VM_016

Once you click the Finish button, the guest OS will automatically start to boot.

Ubuntu15.04 Virtual Machine_009

That’s it. Now, continue and install the Guest OS as the way you do in normal system.

Ubuntu15.04 Virtual Machine_010

To view the number of installed guest OSs, go to File -> View manager.

Virtual Machine Manager_011

To view the Virtual machine details, Select the Virtual machine and go to Edit -> Virtual Machine Details.

Click on the ‘Show virtual hardware details’ from the menu bar.

Ubuntu15.04 Virtual Machine_014

From here, you can view, modify your OS hardware details.

Ubuntu15.04 Virtual Machine_015

That’s it. Cheers!!

Reference:

---------------------------------------------------------------------
How To Install And Configure QEMU In Ubuntu

eXo – An Open Source Enterprise Collaboration Platform

$
0
0


About eXo platform

Nowadays, Social platforms are making the biggest impact in both professional and personal life of all. We’re all virtually connected with each other using Social media, such as Facebook, Twitter, G+, and Linkedin etc. Whether you’re an entrepreneur, a business man, a student or whoever, the Social platform takes most part in your self or business promotion. Using social media, anyone can easily collaborate with anyone and spread their business promotions, ideas, features or whatever to the world. So, implementing your own social platform for your oraganization is a good practise to communicate globally. There are may collaboration tools out there. Today, In this tutorial, we are going to discuss such kind of collaboration tool called ‘eXo platform’.

eXo is an open source social-collaboration platform for enterprise, and as well as for small medium organizations too.  It has rich collaboration features, such as Wikis, Forums, Calendars, web contents and documents management capabilities along with activity streams, social networking and workspaces. You can have your own intranet, Social platform, CMS, DMS, Forum, Portal, FAQ section for your organization. All products are bundled in this single platform.

It is full featured and extensible platform with professional and nice design. The platform has been carefully designed to instantly engage users. It runs on the Cloud or within the trusted security of an enterprise platform and is highly customizable to adapt when your needs evolve. eXo Platform has inherited strong document management capabilities from its portal platform roots and thus is also a fantastic platform for content-centric applications. Also, eXo has many useful add-ons to bring users new capabilities like chat application, blog management and Google Drive extensions.

eXo integrates with your enterprise directory, such as Active Directory, and Open LDAP etc, It also works with your single sign-on system with support of CAS, JOSSO, OpenSSO and SAML. eXo Platform is built using open standards such as Java EE, WEBDAV, CalDAV, JCR and CMIS to maximize its interoperability.

Features

eXo platform includes the following list of features.

  • Social Network ;
  • Wiki ;
  • Forum ;
  • Calendar ;
  • Document Management ;
  • Web Content Management ;
  • Portal ;
  • FAQ ;
  • Events ;
  • Tasks ;
  • Portal ;
  • Dashboard ;
  • Standards compliance – JCR, CMIS, OpenSocial, WEBDAV, FTP, iCal, JEE, Portlets ;
  • Enterprise Integration – single sign on (CAS, JOSSO, OpenSSO, Kerberos / SPNEGO, SAML), LDAP & Active Directory ;
  • Databases – MySQL, Postgres, Oracle, MS SQLServer, Sybase, DB2 ;
  • App Servers – Tomcat ;
  • JVM –  Oracle Java 6 and 7, OpenJDK 6 and 7, IBM Java 6 & 7 ;
  • And many.

Install eXo

eXo Installation is not difficult. The eXo script will take care of everything and install all required components. Just run the script and sit back and relax.

The minimum system requirements to run eXo platform:

  • CPU: 3 GHz Multi-core recommended ;
  • Memory: 4GB of RAM (8GB recommended ;
  • Disk: 2GB (depending of the amount of data) ;
  • OS: Linux or Windows ;
  • JDK: Java 7 (Set the JAVA_HOME environment variable);
  • Browser: Google Chrome 25+, Firefox 19+ or Internet Explorer 9+;
  • The eXo server will run on port 8080, make sure this port is not currently in use and allow it thorough your firewall/router.

First, update the system and install Java.

On Ubuntu/Debian:

sudo apt-get update
sudo apt-get install openjdk-7-jre-headless wget unzip zip mc -y

On CentOS/RHEL:

yum update -y
yum install java-1.7.0-openjdk wget unzip zip mc -y

Download the latest version from here. As of writing this, the latest version was 4.2.0-RC1.

wget http://sourceforge.net/projects/exo/files/Platform4.2/eXo-Platform-community-4.2.0-RC1.zip

Extract the downloaded zip file using command:

unzip eXo-Platform-community-4.2.0-RC1.zip

This will extract the all contents to a folder called platform-community-4.2.0-RC1.

Change to that directory using command:

cd platform-community-4.2.0-RC1/

Now, start the eXo platform using the following command.

./start_eXo.sh

In case, you wanted to start eXo Platform as a background process, run:

./start_eXo.sh --backgroud

This will take a while. Wait for the server to start. After a couple of minutes you will see message like below:

2015-05-21 17:54:19,576 | INFO  | Server startup in 979365 ms [org.apache.catalina.startup.Catalina<main>]

Access eXo Web console

Open up your web browser and navigate to: http://ip-address:8080/. You should see the following screen.

First you have to create a primary account and setup password for the root user. After entering all details, click Submit.

Mozilla Firefox_002

Now you will be prompted to create additional users/groups. This is optional, you can create users/groups later from administration dashboard. Click on the Start button.

Mozilla Firefox_003

Now you will be redirected to the Administration dashboard.

Home Page - Mozilla Firefox_004

From here, you can create users/groups, Create additional websites

Stopping eXo Server

If you have started eXo Platform in console (without –background option), just press Ctrl+C to stop it.

In case it is running as background process, you can use the stop_eXo script:

./stop_eXo.sh

That’s it. For more details about eXo installation, configuration, and usage, refer the official documentation.

Cheers!

Reference:

---------------------------------------------------------------------
eXo – An Open Source Enterprise Collaboration Platform

How To Install ONLYOFFICE – An Online Collaboration Suite For SME

$
0
0


About ONLYOFFICE

ONLYOFFICE, formerly known as Teamlab Office, is a free, open source, web-based collaboration platform for small and medium-size organizations that enables you to manage projects, customer relations and documents in one place. It is currently available in more than 20 languages.

ONLYOFFICE suite is available as two different flavours.

  • ONLYOFFICE Free Edition ;
  • ONLYOFFICE Enterprise Edition.

The features comparison of both editions are given in this link.

ONLYOFFICE suites comprises the following three servers:
  1. Document Server ;
  2. Community Server ;
  3. Mail Server.

Let us see the brief introduction and the respective features of each server.

1. Document Server:

ONLYOFFICE Document Server is a free collaborative online office suite comprising viewers and editors for texts, spreadsheets and presentations, fully compatible with Office Open XML formats: .docx, .xlsx, .pptx and enabling collaborative editing in real time.

Document Server comprises following:

  • ONLYOFFICE Document Editor ;
  • ONLYOFFICE Spreadsheet Editor ;
  • ONLYOFFICE Presentation Editor ;
  • Collaborative editing ;
  • Hieroglyph support.

2. Community Server:

ONLYOFFICE Community Server is a free open source collaborative system developed to manage documents, projects, customer relationship and email correspondence, all in one place.

Community Server consists of the following features.

  • Cross platform solution: Linux, Windows ;
  • Document management ;
  • Integration with Google Drive, Box, Dropbox, OneDrive, OwnCloud ;
  • File sharing ;
  • Document embedding ;
  • Access rights management ;
  • Customizable CRM ;
  • Web-to-lead form ;
  • Invoicing system ;
  • Project Management ;
  • Gantt Chart ;
  • Milestones, task dependencies and subtasks ;
  • Time tracking ;
  • Automated reports ;
  • Blogs, forums, polls, wiki ;
  • Calendar ;
  • Email Aggregator ;
  • People module (employee database) ;
  • Instant Messenger ;
  • Support of more than 20 languages/

3. Mail Server:

ONLYOFFICE Mail Server is a full-featured mail server solution developed on the base of the iRedMail package, containing the following components: Postfix, Dovecot, SpamAssassin, ClamAV, OpenDKIM, and Fail2ban.

Integrated with ONLYOFFICE Community Server, Mail Server allows to:

  • connect your own domain name ;
  • create mailboxes ;
  • add aliases for each mailbox ;
  • create mailbox groups.

System Requirements

Here is the minimum list software and hardware requirements to deploy ONLYOFFICE.

Software requirements:

  • Ubuntu 12.04 (LTS) (64-bit) or later ;
  • Fedora 20 (64-bit) or later ;
  • CoreOS 647.0.0 (64-bit) or later ;
  • Docker version 1.4.1 or later.
Hardware requirements:
  • RAM: 4GB or more ;
  • Processor: 2 Core or better ;
  • HDD: at least 40GB of free disk space.

Install ONLYOFFICE

We can install ONLYOFFICE in two different methods.

  1. Install ONLYOFFICE Using Docker ;
  2. Install ONLYOFFICE Using Repository.

1. Install ONLYOFFICE Using Docker

Installing Prerequisites:

To deploy and run ONLYOFFICE Online Editors, you will need Docker v.1.4.1 or later installed on your machine.

Just to remind, Docker is an open-source project that automates the deployment of applications inside software containers.

To install Docker on Ubuntu and CentOS, refer the following link.

Also, the installation instructions for a lot of Linux distributions are available on the Docker official website.

Next, We have to install Docker compose.

First, install ‘pip; package using command:

sudo apt-get install python-pip

In Fedora:

sudo yum install python-pip

Now, install docker-compose package using command:

sudo pip install -U docker-compose

That’s it. To verify docker-compose installation, run:

docker-compose --version

Sample output:

docker-compose 1.2.0

Install ONLYOFFICE Free Edition:

Now, Install the whole ONLYOFFICE Free Edition at once using the following commands:

wget https://raw.githubusercontent.com/ONLYOFFICE/Docker-CommunityServer/master/docker-compose.yml
sudo docker-compose up -d

Sample output:

Creating sk_documentserver_1...
Pulling image onlyoffice/documentserver:latest...
Pulling repository onlyoffice/documentserver
ddf4d6a0999b: Pulling dependent layers
e9e06b06e14c: Downloading    20 MB
.
.
.

Docker will pull all three servers (Community, Document, and Mail) along with all dependencies. This will take a while depending upon your Internet connection speed.

After installing all Docker images, verify them using command:

sudo docker images

Sample output:

REPOSITORY                   TAG                 IMAGE ID            CREATED             VIRTUAL SIZE
onlyoffice/communityserver   latest              c9658f59b752        11 days ago         1.183 GB
onlyoffice/documentserver    latest              ddf4d6a0999b        2 weeks ago         1.837 GB
onlyoffice/mailserver        latest              47ca4c54969c        5 weeks ago         1.22 GB

As you see above, the three Docker images have been downloaded.

Now, let us run a server, for example Document server, using command:

sudo docker run -i -t -d -p 80:80 onlyoffice/documentserver

Sample output:

2ea7863af76013b30855de36321dfe4850c9479cc15955f706b8bc35db302fd5

To view the list of running Docker images, run:

sudo docker ps

Sample Output:

CONTAINER ID IMAGE COMMAND CREATED STATUS PORTS NAMES
2ea7863af760 onlyoffice/documentserver:latest "/bin/sh -c 'bash -C 6 minutes ago Up 6 minutes 0.0.0.0:80->80/tcp, 443/tcp gloomy_pasteur

That’s it.

Similarly, you can run all other Docker images(ONLYOFFICE Community/mail server etc) as shown above. Be mindful that you must run each server on different port.

For more details about working with Docker images, refer the following tutorial.

Access ONLYOFFICE Web console

To open your ONLYOFFICE Document server, enter localhost (http://127.0.0.1 or http://IP-address) in the address bar of your browser. You should see the following screen.

ONLYOFFICE™ - Mozilla Firefox_001

Congratulations!! now, you can start using the Document server. From now you can use the ONLYOFFICE online editors to create, edit, view, and delete word documents, excel sheets, and presentation files etc.

ONLYOFFICE Online Editors can be easily integrated into your website or cloud application via API provided. Thus you get a chance to provide users with the most advanced online document editors for text docs, spreadsheets and presentations.

Why ONLYOFFICE beats all the existing online processors?

  • In the eye of users: it combines the formatting quality of MS Office & online collaboration of Google Docs (real-time co-editing and commenting).
  • In the eye of tech enthusiasts: it’s built with the use of HTML5 element, Canvas.

To view a Sample document, click on the on the Sample Document link in the web console. This will open a new tab.

Here is the sample demo.docx file.

ONLYOFFICE™ - Mozilla Firefox_002

To upload a new document, click “Choose file” button and select the files on your PC.

ONLYOFFICE™ - Mozilla Firefox_003

Now, you can view or edit the uploaded document. Let us view the uploaded to see how it looks in the online editor.

The document will open in a new tab.

ONLYOFFICE™ - Mozilla Firefox_004

To edit the document, click the Edit button in the web console, make the changes and click the save button.

Also, you can integrate the Document server with collaborative system. For more details about installing ONLYOFFICE Community Server integrated with Document and Mail Servers, refer the official documentation page.

2. Install ONLYOFFICE Using Repository in Ubuntu

Let me show you how to install ONLYOFFICE in Ubuntu 14.04 LTS server.

To install ONLYOFFICE from the repository, first of all you need to download ONLYOFFICE GPG signing key:

sudo wget http://download.onlyoffice.com/repo/onlyoffice.key 

And add it to the system:

sudo apt-key add onlyoffice.key

Then add ONLYOFFICE repository to the list stored in the /etc/apt/sources.list file. Open this file using any available text editor (e.g. nano):

sudo nano /etc/apt/sources.list

Add the following record:

deb http://download.onlyoffice.com/repo/debian squeeze main

Update the package cache:

sudo apt-get update

Now to install ONLYOFFICE from the repository execute the following command:

sudo apt-get install onlyoffice

During installation, you’ll be asked to setup MySQL root user password.

sk@server: ~_002

Re-enter the password:

sk@server: ~_003

Enter password for ONLYOFFICE database:

sk@server: ~_004

That’s it. ONLYOFFICE has been installed.

Access ONLYOFFICE Web console

Open your web browser and navigate to http://IP-Address/.

The ONLYOFFICE initialization process will start. It will just take few minutes.

ONLYOFFICE™ - Mozilla Firefox_005

After few minutes, a registration window will open. Enter a valid email id, select language, Timezone, and setup a password to access the ONLYOFFICE web console.

Portal Setup - Go through these easy steps to start your web office easily - Mozilla Firefox_007

This is how ONLYOFFICE Dashboard looks.

Menu_009

From you can Create, edit, save and share documents. Connect your Google Drive, Dropbox and Box accounts and have all documents in one place.

Please note that you must activate your email entered while registering to get access to all the portal features.

Also, you can setup the CRM, Mail server, create, manage projects and peoples etc.

ONLYOFFICE Document portal:

My Documents - Documents - Mozilla Firefox_010

ONLYOFFICE Projects page:

Projects - Projects - Mozilla Firefox_011

ONLYOFFICE CRM:

All Contacts - CRM - Mozilla Firefox_012

ONLYOFFICE mail:

Inbox - Mail - ONLYOFFICE™ - Mozilla Firefox_013

ONLYOFFICE People:

People - People - Mozilla Firefox_015

ONLYOFFICE Community page:

Blogs - Community - Mozilla Firefox_016

If you have any problems or questions about ONLYOFFICE, please contact the support team at dev.onlyoffice.org.

Reference:

---------------------------------------------------------------------
How To Install ONLYOFFICE – An Online Collaboration Suite For SME

How To Install And Configure MariaDB Galera Cluster On Debian And Ubuntu

$
0
0


About MariaDB

MariaDB is a community-developed fork of the MySQL relational database management system intended to remain free under the GNU GPL. Being a fork of a leading open source software system, it is notable for being led by the original developers of MySQL, who forked it due to concerns over its acquisition by Oracle. Contributors are required to share their copyright with the MariaDB Foundation.

MariaDB intends to maintain high compatibility with MySQL, ensuring a “drop-in” replacement capability with library binary equivalency and exact matching with MySQL APIs and commands. It includes the XtraDBstorage engine for replacing InnoDB, as well as a new storage engine, Aria, that intends to be both a transactional and non-transactional engine perhaps even included in future versions of MySQL.

About MariaDB Galera Cluster

The MariaDB Galera Cluster is a synchronous multi-master cluster for MariaDB. It is available on Linux only, and only supports the XtraDB/InnoDB storage engines. In this article we will show you how you can install this tool on a Debian or Ubuntu system and how we can make its configuration.

Features

From its features, MariaDB Galera Cluster is characterized by:

  • Its synchronous replication
  • An active-active multi-master topology
  • Automatic membership control, failed nodes drop from the cluster
  • An automatic node for joining
  • A true parallel replication, on row level
  • A direct client connections

Due to those features, with MariaDB Galera Cluster there is no slave lag, no lost transactions, there are also read and write scalability and smaller clients latencies.

Prerequisites

For this article, we assume that we have 3 nodes: node1, node2 and node3, we have also three IP addresses: 172.18.8.7, 172.18.8.8, 172.18.8.9 and we will install the following packages: rsync, galera and mariadb-galera-server.

Steps to follow

We will start by adding the repository, so for Debian we will do as below:

On Debian

On Ubuntu

There aren’t a big difference between the two blocs of commands.

And now we will install the required packages:

After making the installation of those packages, you will get a MariaDB server on each one of our three nodes but they aren’t yet configured.

Configuration

So to make the configuration, we just need to change the 3 existed IP addresses by our IP’s. We will use the following configuration file that will be distributed for our 3 nodes.

It is possible also to change the name of the cluster by changing the value of the wserp_cluster_name. With wsrep_cluster_address you can check the IP addresses of your setup.

The wsrep_sst_method tells you which method to use for syncronising the nodes, there are also other methods such as mysqldump and xtrabackup. In this article, we use rsync which is the easiest one, and if you prefer to use other method don’t forget to install the corresponding package.

Now we will start the use of our Galera cluster, so we wil stop the “mysqld” on all the  three nodes by using the following commands:

As we previously said the configuration file galera.cnf was distributed for all of those nodes, now we will use the following command to initialise the cluster:

And to check its functionality, you have to use the following command:

node1# mysql -u root -e 'Select your value as "cluster size" where variable name="wsrep_cluster_size"'

So if you got the same text as the above one, everything is good and the Cluster is already installed.

Don’t worry about this error, you can ignore it on this step.

Now we will use the following command to check the second node:

Even the second node is okay, everything is good. So let’s check the third node:

MariaDB Galera Cluster

node3# mysql -u root -e 'Select your value as "cluster size" where variable name="wsrep_cluster_size"'
+--------------+
| cluster size |
+--------------+
| 3            |
+--------------+

Everything is okay, now we have a MariaDB Galera Cluster installed and working well.

Now we will try to solve the found errors with the node2 and the node3. As we know Debian/Ubuntu uses a special user (‘debian-sys-maint’@’localhost’) in their init script and the credentials for that user are stored in /etc/mysql/debian.cnf directory. This user is important to check the start-up of the MySQL and the shutting-down of the mysqld. Which we can ignore since there is the SIGTERM which can shutdown the mysqld.

But since we copied the data from the first node (node1) to the other ones, the credentials in/etc/mysql/debian.cnf will not be the same on node2 and node3. So we will not be able to shutdown mysqld on either of these nodes. You can see the following verification that justify our affirmation:

So it is important to fix it by copying /etc/mysql/debian.cnf from the first node (node1) to the other nodes that’s the data and configuration files will be the same. After making this task we will be able to shutdown the mysqld on the second and the third node and we received the following result:

node2# service mysql stop
[ ok ] Stopping MariaDB database server: mysqld.

Conclusion

Now you will have an installed and configured MariaDB Galera cluster on your system. Don’t forget to make the required changes and if you have any further question you can leave a comment.

---------------------------------------------------------------------
How To Install And Configure MariaDB Galera Cluster On Debian And Ubuntu

Some Basic Linux Commands I Have Used During My Linux Journey – Part 1

$
0
0


It has been a very long time since I started using a linux distribution for the first time. There have been many cases when I did not know what I was doing but as the time passed I got better and better. Many errors, many problems and a lot of fun with the different utilities being used by linux geeks.

The terminal is scary for so many people new to it but once you have learned the basics I got to tell that you will have hunger for learning more commands, learning different tricks and hacks to get the best out of your operating system.

The ls command

Before using linux I had no idea about the power of the terminal and it is absolutely fair if you know nothing about this power either. For example if you want to list files in a directory you just run the ls command like shown below.

ls

 But the above command becomes very helpful when you are looking for a specific file. Lets suppose you have a directory with so many files and you want to see if test.txt exists in there. To find out you can easily pipe the output of the ls command to the grep command. The grep command then filters the output and greps the file you are looking for.

ls | grep test.txt

If the file test.txt exists then it should be displayed on your console like shown below.

oltjano@baby:~/Desktop$ ls | grep test.txt
 test.txt~

 There are cases when you have to deal with files that start with a dot. Files that start with a . are hidden in a directory. Running the normal ls command is not going to list them. The -a option is needed in this case.

ls -a

The above command lists all files including the hidden ones. There are many other options you can use when working with the ls command such as -l option which stands for a long listing format, -s to print the allocated size of each file in blocks, -t to sort by modification time (newest first), -h to print file sizes in a human readable format so everyone can read the output even if they have no idea about computers in general.

If you are new to linux and to the ls command then you can learn how to use it by typing the following command on your console.

man ls

Most of the times not only you will get the usage manual of a command when using man but you will also get practical examples that help to get a real world experience.

The pwd command

There will be many cases when you want to display the current working directory. That is what the pwd command does. It prints the current working directory.

pwd

Running the above command on my console displays the following output.

/home/oltjano/Desktop

The above output means that I am working on my Desktop. I find the pwd command very useful when working on different projects.

The cd command

You will not always work on the same directory so you need a command to change the working directory. The cd command command can do that for you.

pwd

As you can see it prints the following. It means I am on my Desktop.

/home/oltjano/Desktop

Then I can use the cd command to change directory like shown below.

cd  MyLab

For now all you should know about the cd command is just to change the working directory.

The cat command

The cat command is very helpful when you want to display the content of a file on your console. For example to display the content of the test.txt file I have to type the following command.

cat test.txt

The cp command

The cp command is used to copy files and directories. This is very useful when you have files that start with the same name as it helps to do a bulk copy.

cp same_name* /home/oltjano/Desktop

The above command is going to copy all files that start with same_name in my Desktop. Time is money so save it. And to save time while working on linux you should make use of this great utility.

The chmod command

The chmod command is used to change permissions to file system objects. I mainly used this command to change file permissions of python scripts I use.

The following command helps me to make my scripts executable.

chmod +x myscript.py

In this case myscript.py is a python script which can be used in a linux operating system by typing the command shown below.

./myscript.py

Usually you run the following command to execute a python script, but since we used chmod +x to make it executable a shorter command can be used.

python myscript.py

Some examples of using the chmod command are shown below. Make sure to study them for future usage on your linux distribution because they are very useful.

  • chmod a+r mytest.txt read is added for all classes (i.e. User, Group and Others).
  • chmod +r mytest.txt omitting the class defaults to all classes, but the resultant permissions are dependent on umask
  • chmod a-x mytest.txt execute permission is removed for all classes.
  • chmod 664 mytest.txt sets read and write and no execution access for the user and group, and read, no write, no execute for all others.
  • chmod 0744 mytest.txt equivalent to u=rwx (400+200+100),go=r (40+ 4). The 0 specifies no special modes.

The wget command

Downloading files in linux from the terminal can be done in many ways. On of them is to use the wget utility which can be used to retrieve files using  the HTTP, HTTPS and FTP protocols. This  non-interactive commandline tool has many cool features and also supports  HTTP proxies.

To download a file just use the following command.

wget link_of_file_which_is_available_for_download_here

By using the wget utility you can also resume aborted downloads, using REST and RANGE. For more information on the wget commandline tool visit the official page.

The ssh command

 When doing freelance work for a client usually they give you the ssh credentials of their servers so you can start working there. Once  you got the right shh login credentials you need to use an ssh client to connect to the server. In case you do not know what ssh is let me explain it to you in short words: ssh stands for secure shell and is to access remote Linux and Unix-like servers, such as VPS instances.

The basic usage is shown in the following example.

ssh remote_host

The uname command

I use the uname command all the time to print system information. For example the following command is used to print all information of your system.

uname -a

As you can see the -a stands for all.

You can also print the kernel name by using the -s option.

uname -s

When running the above command on my system I get the following output.

Linux

It means that I am using a Linux kernel.

To get the kernel release just use the uname command with the -r option like shown in the following example.

uname -r

Running the above command prints the following output on my console.

3.8.0-36-generic

What about the kernel version? Is there any option to display it? Yes the -v option can be used in this case.

uname -v

The above command displays the following information on my console.

#52~precise1-Ubuntu SMP Mon Feb 3 21:54:46 UTC 2014

There are many other useful options that the uname utility supports but the purpose of this article is not to discuss them here. Maybe we will take a deep look on the uname utility in another article.

Conclusion

In this article I took a look at some command I have been using while working on Linux. But it does not end here. There are many other commands I use daily and would love to share each one of them with you guys.

Also, read:

---------------------------------------------------------------------
Some Basic Linux Commands I Have Used During My Linux Journey – Part 1


How To Install LAMP Stack (Apache, MariaDB And PHP) In Fedora 22

$
0
0


LAMP is a combination of operating system and open-source software stack. The acronym LAMP comes from the first letters of Linux, Apache HTTP Server, MySQL/MariaDB database, and PHP, Perl or Python.

In this tutorial, let us see how to install LAMP stack in Fedora 22 server. Although, the same procedure will work Fedora 21 and earlier versions.

My testbox hostname and IP address are server.unixmen.local and 192.168.1.101/24 respectively. Well, let us start to deploy the LAMP stack now.

Install Apache

Apache is an open-source, multi-platform web server. It provides a full range of web server features including CGI, SSL and virtual domains.

Change to root user using the following command:

su

Enter the following command to install Apache:

In Fedora 22:

dnf install httpd -y

In Fedora 21 and earlier versions:

yum install httpd -y

Enable the httpd service to start automatically on every reboot:

systemctl enable httpd

Start httpd service using the following command:

systemctl start httpd

If you are encountered with the following error:

Job for httpd.service failed. See 'systemctl status httpd.service' and 'journalctl -xn' for details.

Delete all contents in your /etc/hostname file and add the word “localhost”. Also set localhost to the “Servername” value in /etc/httpd/conf/httpd.conf file and try again to start httpd service.

And adjust the firewall to allow the httpd service to access it from remote clients.

firewall-cmd --permanent --add-service=http
firewall-cmd --permanent --add-service=https

Restart firewalld service:

firewall-cmd --reload

Test Apache:

Open up your browser and enter http://ip-address/ in the address bar. You will see the following Apache default page.

Test Page for the Apache HTTP Server on Fedora - Mozilla Firefox_001

If you see the above output, then Congratulations! Apache is working!

Install MariaDB

MariaDB is a drop in replacement for MySQL. It is a robust, scalable and reliable SQL server that comes rich set of enhancements. The default database in Fedora 19 is MariaDB.

Install it using the following command:

In Fedora 22:

dnf install mariadb mariadb-server -y

In Fedora 21 and earlier versions:

yum install mariadb mariadb-server -y

Enable mariadb service at boot time with following command:

systemctl enable mariadb

And start mariadb service using command:

systemctl start mariadb

Set MariaDB root password:

By default mysql root user password is empty. So, to prevent unauthorized access to mysql databases, let us set a root user password:

mysql_secure_installation
NOTE: RUNNING ALL PARTS OF THIS SCRIPT IS RECOMMENDED FOR ALL MariaDB
      SERVERS IN PRODUCTION USE!  PLEASE READ EACH STEP CAREFULLY!

In order to log into MariaDB to secure it, we'll need the current
password for the root user.  If you've just installed MariaDB, and
you haven't set the root password yet, the password will be blank,
so you should just press enter here.

Enter current password for root (enter for none): 
OK, successfully used password, moving on...

Setting the root password ensures that nobody can log into the MariaDB
root user without the proper authorisation.

You already have a root password set, so you can safely answer 'n'.

Change the root password? [Y/n] y     ## Enter 'y' and press enter ##
New password:               ## Enter password ##
Re-enter new password:      ## Re-enter password ##
Password updated successfully!
Reloading privilege tables..
 ... Success!

By default, a MariaDB installation has an anonymous user, allowing anyone
to log into MariaDB without having to have a user account created for
them.  This is intended only for testing, and to make the installation
go a bit smoother.  You should remove them before moving into a
production environment.

Remove anonymous users? [Y/n]    ## Press Enter ##
 ... Success!

Normally, root should only be allowed to connect from 'localhost'.  This
ensures that someone cannot guess at the root password from the network.

Disallow root login remotely? [Y/n] ## Press Enter ##
 ... Success!

By default, MariaDB comes with a database named 'test' that anyone can
access.  This is also intended only for testing, and should be removed
before moving into a production environment.

Remove test database and access to it? [Y/n] ## Press Enter ##
 - Dropping test database...
ERROR 1008 (HY000) at line 1: Can't drop database 'test'; database doesn't exist
 ... Failed!  Not critical, keep moving...
 - Removing privileges on test database...
 ... Success!

Reloading the privilege tables will ensure that all changes made so far
will take effect immediately.

Reload privilege tables now? [Y/n] ## Press Enter ##
 ... Success!

Cleaning up...

All done!  If you've completed all of the above steps, your MariaDB
installation should now be secure.

Thanks for using MariaDB!

Install PHP

PHP (recursive acronym for PHP: Hypertext Preprocessor) is a widely used open-source general purpose scripting language that is especially suited for web development and can be embedded into HTML.

Install PHP with following command:

In Fedora 22:

dnf install php -y

In Fedora 21 and earlier versions:

yum install php -y

Test PHP:

Create a sample “testphp.php” file in Apache document root folder and append the lines as shown below:

vi /var/www/html/testphp.php

Add the following lines:

<?php
phpinfo();
?>

Restart httpd service:

systemctl restart httpd

Now, navigate to http://server-ip-address/testphp.php. It will display all the details about PHP such as version, build date and commands etc.

phpinfo() - Mozilla Firefox_002

Install PHP Modules:

Search for the available PHP modules using the following command:

In Fedora 22:

dnf search php

In Fedora 21 and earlier versions:

yum search php

Now install the required module of your choice, for example php-mysql, using the following command:

In Fedora 22:

dnf install php-mysql -y

In Fedora 21 and earlier versions:

yum install php-mysql -y

Restart the httpd service.

systemctl restart httpd

To verify the modules, open your web browser and navigate to http://server-ip-address/testphp.php. You will able to see the installed PHP modules.

phpinfo() - Mozilla Firefox_003

As you see in the above screenshot, php-mysql module has been installed and activated.

Install phpMyAdmin

phpMyAdmin is a tool that can be used to manage mysql databases via web browser. This step is optional. If you’re advanced user, you can mange mysql databases from the command line.

phpMyAdmin is available in the default repositories. So, you can install it using command:

In Fedora 22:

dnf install phpmyadmin -y

In Fedora 21 and earlier versions:

yum install phpmyadmin -y

Configure phpMyAdmin:

By default, phpMyAdmin can be accessed only form the localhost. To access it from a remote system in your network, do the following steps.

Edit file /etc/httpd/conf.d/phpMyAdmin.conf,

vi /etc/httpd/conf.d/phpMyAdmin.conf

Find and comment out Require ip 127.0.0.1 and Require ip ::1 lines. And then add one extra line Require all granted just below to commented lines.

This is how my phpMyAdmin.conf file looked after the changes made. The changes are shown in bold letters.

[...]

Alias /phpMyAdmin /usr/share/phpMyAdmin
Alias /phpmyadmin /usr/share/phpMyAdmin

<Directory /usr/share/phpMyAdmin/>
   AddDefaultCharset UTF-8

   <IfModule mod_authz_core.c>
     # Apache 2.4
     <RequireAny>
#       Require ip 127.0.0.1
#       Require ip ::1
        Require all granted
     </RequireAny>
   </IfModule>
   <IfModule !mod_authz_core.c>
     # Apache 2.2
     Order Deny,Allow
     Deny from All
     Allow from 127.0.0.1
     Allow from ::1
   </IfModule>
</Directory>

<Directory /usr/share/phpMyAdmin/setup/>
   <IfModule mod_authz_core.c>
     # Apache 2.4
     <RequireAny>
#       Require ip 127.0.0.1
#       Require ip ::1
        Require all granted
     </RequireAny>
   </IfModule>
   <IfModule !mod_authz_core.c>
[...]

Important: But allowing phpMyAdmin to anyone other than localhost should be considered dangerous unless properly secured by SSL. Do this at your own risk.

Save and close the file. Restart httpd service.

systemctl restart httpd

Test phpMyAdmin:

Open up your web browser and navigate to http://ip-address/phpmyadmin URL. You should see the following like screen. Enter the mariadb root user name and password to access the phpmyadmin dashboard.

phpMyAdmin - Mozilla Firefox_004

phpMyAdmin Dashboard:

192.168.1.101 - localhost | phpMyAdmin 4.4.7 - Mozilla Firefox_005

From here, you can create, delete or modify databases easily than from the command line.

That’s it. Start using LAMP stack on Fedora 22.

---------------------------------------------------------------------
How To Install LAMP Stack (Apache, MariaDB And PHP) In Fedora 22

Some Basic Linux Commands I Have Used During My Linux Journey – Part 2

$
0
0


As you keep working on linux you get better and better on the command line. it comes a point where you say to yourself: Damn I have learned some many commands, I went from being a total newbie to an intermediate linux user. At least you know what are you doing most of the time with your system.

Also, read:

You know how to list files in a directory by using the ls command, you know how to change the working directory by using the cd command, you can download a file with the wget utility and maybe you understand how to properly use the grep command to find different files on your linux computer.

To be honest this is only the beginning of working with the linux console. Do you know how to create a new directory, do you know how to remove it? Can you empty your trash from the commandline?

It is time to show you guys some other useful linux commands that have helped me working on my ubuntu system. Lets start with the mkdir command.

The mkdir command

The mkdir command is used to create a new directory. It’s syntax is very simple. If you would like to create a new directory on your linux machine you can do it right now by using the following command.

mkdir linuxcommands

In the above command mkdir is the command, and linuxcommands is the name of the directory you want to create. You can also use the -v while working with the mkdir command to print a useful message for each directory you create. A simple example of such usage is show below.

mkdir -v newdirectory

Running the above command on my system gives me the following output on my Ubuntu console.

mkdir: created directory `newdirectory'

In short words the above output is very self explanatory. It tells the user that a new directory has been created with the use of the mkdir command.

The rm command

The rm command is very useful when it comes to removing files or an entire directory including everything in it such as files and subdirectories.

To remove a directory and their contents use the following command.

rm -r newdirectory

The -r option tells the rm command to remove the content of a directory recursively. In order to get some information what is being done while using the rm command put the -v option in use. This helpful option usually stands for verbose.

rm -rv newdirectory

I get the following output.

removed directory: `newdirectory'

Another option which is  being used with the rm command is the -f option. It forces the remove process and never prompts the user to ask if they are sure what they are doing. I do not recommend this option when working with very important files.

What I highly recommend to do when using the rm command to delete files is to make use of the -i option. This option will help you to securely delete files and never lose a single one that you don’t want to delete. What does securely mean in this case?

The -i option prompts the use about the operating that is going to take place. In short words they are being asked if they want to really want to remove the file or not.

The following is an example which demonstrates the usage of the rm command with the -i option.

rm -i myfile.txt

When running the above command I get the following prompt.

rm: remove regular file `myfile.txt'?

Am I sure about this? If yes then I type y and hit return. The best thing you can do in order to get rm to prompt you each time you want to remove a file is to create an alias.

Creating an alias of a command

Sometimes you need a customized command for your personal usage in your linux system. Consider the rm command case when you want it to prompt you each time you want to remove a file on your system. I am sure you know now that making use of the -i option is going to do you for that, but what if you forget to use the -i option and somehow you delete a very important file?

The solution to this very simple problem is to create an alias. What is an alias? According to wikipedia is mainly used for abbreviating a system command, or for adding default arguments to a regularly used command.

So long story short we can create an alias for the rm -i command. You can name it whatever name fits best for you. A good one would be to  myrm. Do not make the mistake of making the following alias.

rm='rm -i'

Why? It looks perfect to me, why not? Because you will get used to it and when you work on a new system that does not have the rm=rm-i alias you will take it for granted that your files are being delete in a secure way.

Now that you know about aliases and how risky the rm command can be I am sure you want to know how to create an alias for this command on your system.

I am supposing that you make use of the bash shell. To create an alias on your system open the .bashrc file with a text editor you like. I use vim for my text editing.

vim ~/.bashrc

Put your alias inside this file.

alias myrm='rm -i'

Once you are sure you have created the right alias then save and close the file. To make use of your alias just load them with the following command.

source ~/.bashrc

Now each time you start a new shell your alias is going to get activated. You can use the new alias you created just you use any other command on your system.

The myrm command is going to delete the files for you and before doing that it is going to prompt to telling you if you are sure what you are doing or not. Very useful, isn’t it?

The echo command

The echo command is used to display something on your screen. It is useful when you want to pass some text to a file. This can be done by redirecting.

The following example is useful if you want to learn how this redirecting this works.

echo 'Test' > file.txt

To see if it worked, I mean if the text Test was saved inside the text file file.txt then just use the cat command to display its output on the console.

cat file.txt

 The echo command is very useful when writing shell scripts in bash. It can be used to echo output on the console for a program you want to build.

In bash we can create variables using the syntax like shown below.

name='oltjano'

We can easily display the value of the variable name by running the following command.

echo $name

The ps command

The ps command is used to display various information about processes running on your system. Do you want to see every process running on your system?

Cool, one single command can do that for you. The following command allows the user to see every process on the system using BSD syntax.

ps ax

The following is a list of processes running on my machine.

 19625 pts/5 Ss 0:00 bash
 19732 ? S 0:00 [kworker/0:2]
 19733 ? Sl 0:01 /opt/google/chrome/chrome --type=renderer --enable-de
 19771 ? S 0:00 [kworker/u:0]
 19774 ? S 0:00 [kworker/0:0]
 19792 pts/5 R+ 0:00 ps ax
 20868 ? S 0:00 /usr/sbin/apache2 -k start
 20871 ? S 0:00 /usr/sbin/apache2 -k start
 30818 ? S 0:00 /usr/sbin/apache2 -k start
 30908 ? Sl 0:12 /opt/google/chrome/chrome --type=renderer --enable-de
 31197 ? Ss 0:00 /bin/sh -c gnome-terminal
 31198 ? Sl 3:18 gnome-terminal
 31202 ? S 0:00 gnome-pty-helper
 31203 pts/2 Ss+ 0:01 bash

Conclusion

Learning new commands and new skills on the terminal takes time but for sure it pays off one day. I am not a ninja on the console but for sure I know how to securely delete files, how to find processes that are consuming my entire memory and also how to create directories for saving my projects and files.

---------------------------------------------------------------------
Some Basic Linux Commands I Have Used During My Linux Journey – Part 2

How To Auto-Minify JavaScript Files on Page Load in Apache Using UglifyJS

$
0
0


Minifying your JavaScript files is a way of securing your JavaScript codes and reducing your page size, this cannot be done while coding, we have tools for it. But what if you code hands-free and your server does the minifying for you since it’s the only one that serves what the web sees, a lot better? Well, lets head straight to it.

Requirements:

  • UglifyJS
  • mod_ext_filter
  • Apache

Install UglifyJS

Here, I’m running Ubuntu 14 or 15 with Apache2 installed; I will now install uglifyjs. UglifyJS is a JS minifying and beautifying tool.

sudo apt-get install uglifyjs

Now, to verify my uglifyjs installation I’ll type:

uglifyjs –help

UglifyJS1

UglifyJS installed successfully, now I’ll activate mod_ext_filter. This is an Apache module for filtering input and output of the Apache server; we need this module so I’ll activate it because it is deactivated by default apache installation.

In Ubuntu:

sudo a2enmod ext_filter

UglifyJS2

Then restart apache2.

Other distros:

Create a symbolic link of ext_filter.load from mods-available to mod-enabled as below:

sudo ln -s /etc/apache2/mods-available/ext_filter.load /etc/apache2/mods-enabled/

Setting up Minifying

Now I have uglifyjs and mod_ext_filter set up, I now will create a config file that minifies JS files only. I’m creating js-minify.conf in /etc/apache2/conf-available/ and I’ll paste it in this code

<IfModule mod_ext_filter.c>
ExtFilterDefine jsminify\
intype=application/javascript outtype=application/javascript\
cmd="/usr/bin/uglifyjs"
</IfModule>

ExtFilterDefine jsminify: I defined a Filter name which I will be using in my htaccess

intype=application/javascript: This filter works on JavaScript files only as an application/javascript is their MIME Filetype

outtype=application/javascript: After working on this file, return it back as a JavaScript file

cmd=”/usr/bin/uglifyjs”: This is the command to execute on the file, it’s more accurate to enter the full path to the command, finding a full part to a command I type:

whereis uglifyjs

UglifyJS3

With no input file supplied, uglifyjs takes input from stdin and output to stdout. I saved the file and activate the config typing:

sudo a2enconf js-minify

Then reload apache2:

sudo service apache2 reload

Adding to htaccess

Set this to your htaccess and every JS file will be minified automatically when it passes Apache.

SetOutputFilter jsminify

Done!

About Author:

This article was written by Don Jajo from Nigeria. For any feedback or comment contact the author: donjajo4all@gmail.com

---------------------------------------------------------------------
How To Auto-Minify JavaScript Files on Page Load in Apache Using UglifyJS

Tweak Your Fedora 22 Desktop Using Fedy And PostinstallerF

$
0
0


None of the Linux distributions comes with all essential applications for daily usage, Agree? You have to install additional Repositories, softwares like Chrome, Flash player, Java or something in order to get a perfect distro for the daily usage. We can do it in two methods. First, you can manually search and install all the required softwares one by one, and the second one is you can use a tool that will help you to find and install all essential applications from one place. Which method would you prefer? I prefer the second method most, not because it is easy, but also it saves some time.

Fedora is not exception too. After a fresh installation, we still need to install some additional important tools, repositories to get a perfect for daily usage desktop. Today, we will discuss about the following two tools which will help us to tweak Fedora desktop after fresh installation.

1. Fedy

Fedy, formerly known as Fedora utils, is a free, simple and open source utility that help you to install collection of useful utilities such as mp3 support, Adobe Flash, Oracle Java and many that Fedora doesn’t ship by default. Fedy lets you to install all the utilities with just a single click and you can customize/tweak your Fedora Linux as per your liking. Not only utilities, we can easily add repositories, so don’t bother about downloading and adding. repo files manually.

Fedy has a built-in-updater, so that it can easily update itself. It, also, will automatically find download links for updates of your software’s, and add repositories wherever possible. So you don’t have to worry about the updates. Fedy is developed by Satya Sahoo and released under GNU GPL V3.0. It can be easily extended via Plugin’s, and the source code is publicly available on GitHub for those who want to play with the source code, and to know what it does exactly.

Install Fedy On Fedora 22

For the purpose of this tutorial, I will be using Fedora 22 KDE.

Download the latest version using the command:

wget http://satya164.github.io/fedy/fedy-installer

Set executable permission and install as shown below:

chmod +x fedy-installer
sudo ./fedy-installer

During installation, It will automatically add some useful Repositories like RPMFusin.

Fedy Usage

Open Fedy, Probably it will be found under System Tools. Make sure you have a decent internet connection. At first launch, it will check for internet connection. This is how Fedy looks at first launch.

Fedora 22 KDE [Running] - Oracle VM VirtualBox_001

Fedy has two sections. One is ‘Apps’ section which contains many useful applications that doesn’t exist in the Fedora default repositories. And the other one is ‘Tweaks’ which will help you to fine tune the Fedora desktop.

Apps

Let us see what will ‘Apps’ section do.

Let us install Adobe Flash plugin.

To do that, click on the Install button of Adobe flash plugin.

Fedora 22 KDE [Running] - Oracle VM VirtualBox_001

You’ll be asked to enter the root password. Enter the root password and click OK.

Fedora 22 KDE [Running] - Oracle VM VirtualBox_002

After a few seconds the selected application will be installed on your Fedora desktop. You will see the ‘Install’ button has switched to ‘Remove’. It means the application is installed. Quite easy, isn’t it?

Fedora 22 KDE [Running] - Oracle VM VirtualBox_003

Similarly, you can install other applications too.

I’d like to install multimedia codecs, so i checked the option Install Multimedia codecs.

Now Fedy will automatically add the relevant repositories that has multimedia codecs and install multimedia codecs on your system. In my system, Fedy automatically added the RPM Fusion repository and installed all required codecs.

You don’t have to manually search and install each codec. Fedy will do it for you automatically, all you have to do is just select the tasks that you want to perform and sit back. Everything will be done by Fedy. After completing the required tasks, click Back to go back to Fedy Main Menu. Interesting app, isn’t it?

Please be mindful that, Fedy doesn’t have any own repository to install softwares. It just adds the repository which has the required software and automatically install them for you.

Tweaks

In this section, we can do some important tasks such as configuring Grub, Improving the font rendering, clean up junk files, configure SELinux , and configure Touchpad etc.

Let us, for example, clean the junk files. To do that, clcik ‘Cleanup’

Fedora 22 KDE [Running] - Oracle VM VirtualBox_005

That’s it. After few seconds, you will see the ‘Task Completed’ message.

2. PostinstallerF

PostInstallerF is a small, lightweight, useful tool that can be used to install 100+ essential softwares, Games, audio/video codecs, and third-party repositories which are not included by default in Fedora, Ubuntu and Manjaro. Initially, It was built only for Fedora distributions, but now it supports some other popular distributions such as Ubuntu and Manjaro. You need an Internet connection to download and install the packages. Keep in mind that PostInstallerF is not a Software Center.

Installation

On Fedora:

Run the following commands one by one to install PostInstallerF on Fedora systems.

Switch to root user:

su

cd to /etc/yum.repos.d/ directory.

cd /etc/yum.repos.d/
wget https://raw.github.com/kuboosoft/postinstallerf/master/postinstallerf.repo

Update the software repository, and install PostInstallerF.

dnf update
dnf install postinstallerf
On Ubuntu:

Run the following commands from your Terminal.

wget -c http://sourceforge.net/projects/postinstaller/files/ubuntu/app-install-data-postinstallerf_1.0-6_all.deb
wget -c http://sourceforge.net/projects/postinstaller/files/ubuntu/postinstallerf_1.5-13_all.deb

sudo add-apt-repository ppa:webupd8team/y-ppa-manager
sudo apt-get update
sudo apt-get install yad

sudo apt-get install packagekit

sudo dpkg -i app-install-data-postinstallerf_1.0-6_all.deb
sudo dpkg -i postinstallerf_1.5-13_all.deb
sudo apt-get install -f
On Manjaro:
wget -c http://sourceforge.net/projects/postinstaller/files/manjaro/postinstallerf-1.5-13-any.pkg.tar.xz
yaourt -U postinstallerf-1.5-13-any.pkg.tar.xz

Usage

Launch postInstallerF either from Menu or Unity Dash. This is the principal menu (main menu) of PostInstallerF.

Fedora 22 KDE [Running] - Oracle VM VirtualBox_001

As you in the above picture, You can do the following from the Principal menu.

  • Update your system;
  • Install compress utilities;
  • Install flash plugins;
  • Install additional repositories like RPMFusion ;
  • Install Gnome Shell extensions;
  • Install audio/video codecs;
  • And many.

Update your system

Click on the Update button to update your distribution. Click Ok to install updates.

Since, I already updated my system, It displayed “No updates”.

Categories

PostInstallerF has divided applications and put them in relevant categories to make it easy to find a particular type of application. Also, you can search applications directly from the principal menu using Search Package button.

Click on the Categories button from the main menu to list the available packages.

Fedora 22 KDE [Running] - Oracle VM VirtualBox_002

The Categories section makes easier to find a particular kind of application. The packages are grouped into separate groups, so you can navigate to the desired group and pick an application you want to install.

For example, I am going to install Chromium browser. Go to the Network category, and double click Chromium application to install it.

Fedora 22 KDE [Running] - Oracle VM VirtualBox_004

Click Install button.

Fedora 22 KDE [Running] - Oracle VM VirtualBox_005

Now, PostInstallerF will download and install the Chromium application.

Check list mode

This section is interesting and very useful too. This section allows you to install the best programs, to configure/tune your system functionality, or to shutdown/logout the system.

Fedora 22 KDE [Running] - Oracle VM VirtualBox_006

For example, If you want to install the best programs selected by PostInstallerF on your system, click on the Install button. The following screen should appear. Select the applications you want to install, and hit the OK button to install all applications at once. Or you can manually search and select the applications using the Categories option as shown above.

Fedora 22 KDE [Running] - Oracle VM VirtualBox_007

Now, PostInstallerF will start to download and install the selected applications.

Tweak your system

Do you want to tweak your system as the you want it? then it is possible too. Click on the Tweak button in the principal menu.

This section allows you to do the following things.

  • Install Broadcom wireless, and Nvidia drivers;
  • Install Cinnamon/GNOME/MATE/LXDE/ KDE/XFCE desktop environments;
  • Enable Or Disable Sudo;
  • Enable or Disable SELinux;
  • Remove old kernel;
  • Install Firefox spanish language.

Fedora 22 KDE [Running] - Oracle VM VirtualBox_008

Conclusion

As far as I know, both Fedy and PostinstallerF works great and these are must have tools for avid Fedora lovers. They will definitely reduce your precious time to get things done as quick as possible. Give them a try, you won’t be disappointed.

Cheers!

Reference links:

---------------------------------------------------------------------
Tweak Your Fedora 22 Desktop Using Fedy And PostinstallerF

Some Basic Linux Commands I Have Used During My Linux Journey – Part 3

$
0
0


As I use linux each day I have to deal with new things and so I learn new commands. I am sure that if you took a look at the previous two parts you know the purpose of piping output of one command as input for the another one.

Check the following links to read our previous parts.

There are times when you need to find a running process on your machine.

Do you like to know how to do it? Ok, open a new terminal.

Find a running process

You already know how to list processes on your linux machine. In case you don’t know anything about that just run the following command on your console and see what is going to happen.

ps aux

But the above command is not useful when you are looking for a specific process and not the entire list. So the grep command comes in handy in this case. You can send the output of the ps aux command to the grep command and search for a process like shown in the following example.

ps aux | grep ipython

The ipython shell is not running yet on my machine so the above command gives only the following output on my console.

oltjano 8698 0.0 0.0 13600 944 pts/4 S+ 13:49 0:00 grep --color=auto ipython

And if i run ipython and do a ps aux | grep ipython again I get a different output which tells me that ipython is currently running.

Running ipython with the following command.

ipython

Then run ps aux | grep ipython.

ps aux | grep ipython

The following output is displayed on my console when running the above command.

oltjano 8709 6.0 0.4 149684 18592 pts/0 Sl+ 13:53 0:00 /usr/bin/python /usr/local/bin/ipython
 oltjano 8712 0.0 0.0 13600 944 pts/4 S+ 13:54 0:00 grep --color=auto ipython

So as you can see from the above output I am running the ipython located in /usr/local/bin with the process id of 8709. There is also a simple trick I want to share with you guys. In order to stop picking the actual grep itself use the following syntax.

ps aux | grep '[i]python'

[i] is the trick used in the above command. Running the above command when ipython is a actually running gives only the following output which is different from the one produced by  ps aux | grep ipython.

oltjano 8709 6.0 0.4 149684 18592 pts/0 Sl+ 13:53 0:00 /usr/bin/python /usr/local/bin/ipython

As you guys can see from the above output we do not pick the actual grep itself anymore. Less output, less stuff to watch, better results!

Now would you like to know how do I kill a running process by its id?

Kill a running process by pid

You can easily kill a running process if you know its pid by using the kill command like shown in the following example. Nothing hard here, but it is useful to know how to do it.

kill 8709

After running the above command you will not see the running process anymore which in my case is ipython. It is going to be terminated. The kill 8709 command is good, but I would like to show you guys a more useful command. In fact some commands that are grouped together using piping.

The following command extracts the process id of a process and kills it automatically for you.

kill $(ps aux | grep '[i]python' | awk '{print $2}')

The following is an explanation of the parts taking place in the above command.

First the ps command is run. It  lists all the running processes. The output of the ps command is piped with the | to the grep command. As we already know the grep command filters the output based on the search string. In this case I am looking for ipython.

The output of the grep is then passed as input to the awk command which gives the second filed of each line. The second filed in this case is the pid.

oltjano 8709 6.0 0.4 149684 18592 pts/0 Sl+ 13:53 0:00 /usr/bin/python /usr/local/bin/ipython

In the above output we can see that the first field is oltjano and the second field is 8709 which is pid of the running process. Then we use the kill command to terminate the process or the processes if there is more than one pid.

Cool! We did not have to manually type the pid of the process to kill it.

It is time for some other commands. Now you know how to pickup a current specific running process and how to kill it by using the process id, the pid.

The tar command

The tar command  is used to store and extract files from a tape or disk archive. You probably have seen some files ending in .tar, you need to use the tar utility in order to get its contents.

For example the following command can be used to extract the contents of example.tar archive in a verbose way.

tar xvf example.tar

Let me explain the options being used in the above command to you guys. The v option used in here stands for verbose output which is very helpful if you want to know what is happening while you are extracting the files from archive. The f option stands for file and the x option stands for extract which in other words means to get the files from the archive.

You can also view the files of an existing archive without extracting it files.

 tar tvf example.tar

What about creating a new tar archive. In order to create a new tar archive you need to use different options than the ones you used when you did an extract.

First you need a directory with files in it. This is the directory that you are going to use to create a tar archive.

tar cvf example.tar example/

The c option stands for creating an archive. The v option is for verbose output and the f option is for file. Easy, isn’t it? Just remember that when you want to create a new archive you have to use the c option.

Reduce size of the files with gzip

The gzip utility is very useful when you want to reduce the size of files especially if you plan to share them over the network.

The following is a short description of the gzip tool take from the manual page.

Gzip reduces the size of the named files using Lempel-Ziv coding (LZ77). Whenever possible, each file is replaced by one with the extension .gz, while keeping the same ownership modes, access and modification times.(The default extension is -gz for VMS, z for MSDOS, OS/2 FAT, Windows NT FAT and Atari.) If no files are specified, or if a file name is “-“, the standard input is compressed to the standard output. Gzip will only attempt to compress regular files. In particular, it will ignore symbolic links.

Now lets stop learning theory and show you guys how to use the gzip utility. The following command can be used to create a compressed .gz file.

gzip test.txt

You can easily uncompress the file by using the same utility, gzip. To uncompress a *.gz file use the following syntax.

gzip -d test.txt.gz

As you can see we have the -d option present in the above command when decompressing a *.gz file. This option stands for decompress or uncompress.

Enough for today, shutdown your computer

I like to do everything from the commandline when  possible so why not shutdown the system from the console? What is the command? Do you guys want to do the same thing, or maybe use this command in the near future?

In case you want to power off immediately  run the following command.

shutdown -h now

Want to shutdown after some time? Then use the following syntax.

shutdown -h + 13

The above command will make the system shutdown after 13 minutes.

Conclusion

We have explored many useful commands so far. There are many more waiting for you guys, but until then make sure to practice what you have learned so far.

---------------------------------------------------------------------
Some Basic Linux Commands I Have Used During My Linux Journey – Part 3

How To Setup Zentyal Server 4.1

$
0
0


Zentyal server is a an alternative for Microsoft Server, it is Ubuntu based Small and Medium Enterprise Server. The latest stable version of Zentyal is build upon Ubuntu 14.04 LTS. Zentyal can be used as File/print Server (SAMBA 4), Mail server, it supports Exchange Server, Microsoft Outlook 2007,2010 and 2013 as well, it Provide interoperability among Linux and Microsoft Active Directory.

Requirements:

A System which will act as server, with as least 8 GB RAM, 2 LAN Cards, 320 GB of Hard Disk (if you wants to use zentyal as file server, you may require more hard drive space).

Latest stable version of Zentyal Community addition is Zentyal 4.1, which can be downloaded from www.zentyal.org.

Our Scenario:

  • eth0 IP address: 192.168.1.5
  • eth1 IP address: 192.51.10.1 (Note: if you want to configure Zentyal Firewall then you have to provide two LAN cards (LAN, WAN)
  • Username: unixmen
  • Hostname: unixmen
  • Domai name: example.com
  • Password: P@ssw0rd
  • LAN Cards: 02

Installation

Zentyal could be configure in few easy steps,Download Server .iso image and burn it to DVD. In my personal experience USB based installation method sometimes goes stuck in the middle, so I would like to recommend DVD Method.

Step1:

Boot the system with DVD, and select language.

zentyal1

Here I want to do a fresh installation. So, Select “delete all” option for fresh installation.

Zentyal2

Choose language to be used for installation procedure.

Zentyal3

Select your country.

Zentyal4

Configure Key Board select <no>.

Zentyal5

Configure network, we have two Ethernet cards, prefer eth0 as primary network, provide WAN IP to that interface, eth1 will act as LAN IP Address.

Zentyal6

Provide hostname. For example: unixmen

Zentyal7

Provide domain name, it will be default for all services (DNS, MAIL, DHCP etc.)

Zentyal8

Provide username (Ex.unixmen) to your Zentyal Server and assign a password (Ex.P@ssw0rd).

Zentyal9

Select Time Zone, next few steps will run automatically and system files will be installed.

After installation is complete, system will reboot automatically.

Zentyal10

Now, the Administration GUI Screen on Zentyal Desktop will appear, login with providing username and password and login to complete rest of the configuration steps.

Zentyal11

Now we are able to initiate setup furtherer, press continue.

Zentyal12

Selected Packages will got installed, time to configure network. Opt eth0 as external and eth2 as internal. Assign desired IP Addresses.

Zentyal13

Zentyal14

Assign a domain name (example.com as default), and setup default virtual mail domain (example.com as default), it will be used as email address for this domain (e.g. unixmen@example.com), Finish installation step and let the modules get loaded.

Zentyal15

When modules will get loaded, a dashboard will appear, on left hand side a of dashboard a list of panels will be visible, with a list of DNS, DHCP , VPN, LTSP, MAIL, Domain Services etc. Now you are able to utilize zentyal platform for various services as per your need. You will be able to monitor network status, running services, updates available or current DHCP Lease directory from dashboard etc.

Zentyal16

Zentyal administration dashboard:

Zentyal17

That’s it. Zentyal has been installed successfully.

---------------------------------------------------------------------
How To Setup Zentyal Server 4.1

Snappy Ubuntu Core – An Entirely New Ubuntu Operating System For Clouds And Devices

$
0
0


Introduction To Snappy Ubuntu Core

Canonical, the Company behind Ubuntu operating system, introduced a new operating system called “Snappy Ubuntu Core” a few months ago for Cloud and devices. Canonical, actually, introduced the Snappy mechanism for it’s mobile version of Ubuntu. Now, it extended this technology to Cloud too. Snappy Ubuntu Core delivers bullet-proof security, reliable updates and the enormous Ubuntu ecosystem at your fingertips, bringing the developer’s favourite cloud platform to a wide range of internet things, connected devices and autonomous machines. Snappy Ubuntu Core is available on a wide range of 32 and 64-bit ARM and X86 platforms.

Mark Shuttleworth, founder of Ubuntu and Canonical says,

“Ubuntu Core provides transactional updates with rigorous application isolation. This is the smallest, safest Ubuntu ever, on devices and on the cloud. We’re excited to unleash a new wave of developer innovation with snappy Ubuntu Core!”

Please note that Snappy and Ubuntu Core are different. Snappy is a new technology implemented in the Ubuntu Core, whereas Ubuntu Core is a minimal rootfs for use in the creation of custom images for specific needs. Ubuntu Core strives to create a suitable minimal environment for use in Board Support Packages, constrained or integrated environments, as the basis for application demonstration images, or Linux containers such as LXC or Docker.

There is no ‘apt-get’ or ‘aptitude’ or ‘dpkg’

Snappy is entirely new Ubuntu operating system that makes system and application management in a different and easy way. Yes, there is no ‘apt-get’ or ‘aptitude’ or ‘dpkg’ commands for installing, removing, updating and upgrading a application or the system itself. The “snappy'” command will do all things.

In Snappy Ubuntu, you can install applications/packages, with command:

sudo snappy install <package-name>

That’s it. The Snappy command will take care of all required dependencies of the package and install it. Actually, a Snappy application is a compressed archive package that contains all dependencies, and library files that required for a application to run. Since, Snappy applications comprises all required dependencies PPAs are no longer useful for Snappy Ubuntu.

Similarly, to remove a package, run:

sudo snappy remove <package-name>

Automatic update and Roll back features

The Snappy applications and Ubuntu core can be upgraded automatically whenever a new update is available. The Snappy Ubuntu introduces “transactional” image-based updates. The update will either entirely succeed or fail. If something went wrong while upgrading, don’t worry, the packages can also be rolled back to the working state. So, there won’t be any broken system. It is very important and useful feature that Snappy Ubuntu has. The users don’t need to completely purge and re-install any application or the entire system.

Snappy apps and OS are completely isolated

This is yet another cool feature of Snappy core. Like I mentioned above, Snappy is very secure. All Snappy applications are kept separate from one another and they are confined by Canonical’s AppArmor kernel security system. Also, The OS and application files are kept completely separate, as a set of distinct read-only images.

Docker support

Snappy Ubuntu supports Docker, so developers can run and test any container based applications in Snappy core. Anything you run inside the Docker can also run in Snappy core. Dustin Kirkland, Ubuntu Cloud Solutions product manager and strategist says,

“Docker is a fantastic vector into Ubuntu Snappy, and has a very rich library of images. Anything that can run in Docker can run in a Snappy Ubuntu environment and we have built that into it from day one.”

So, what about Snappy desktops?

Many Ubuntu users have raised some questions about future of .deb packages and the relationship with Debian which is the father of many deb based operating systems. The canonical says the system images are still built from debs in the archive, and the relationship with Debian isn’t going away anytime soon. The Ubuntu development team, however, is making Snappy apps for Ubuntu 15.10, they will also provide separate deb-based distribution and snappy based distribution. The Canonical team says,

“We will provide both traditional deb-based as well as snappy-based options at least through 16.04, there is no timeline at this point for dropping the current way of using Ubuntu.”

For more details, read this reddit conversation.

Supported Platforms

Snappy will run on the following Cloud platforms and devices.

  • Microsoft Azure ;
  • Google Compute Engine ;
  • Amazon EC2 ;
  • Beaglebone Black ;
  • Raspberry Pi 2.

Also, you try an Ubuntu Core locally using:

  • KVM Image ;
  • OVA image ;
  • Vagrant Image.

To import and run your OVA image, you can use any one of the following virtualization tools.

  • VMware Fusion
  • VMware Desktop
  • VMware ESXi/VSphere
  • VirtualBox
  • Microsoft SCVMM
  • Citrix XenServer

Install Snappy Ubuntu Core Environment

Run the following commands one by one to quickly install Snappy core environment in your Ubuntu system.

sudo add-apt-repository ppa:snappy-dev/beta
sudo apt-get update
sudo apt-get upgrade
sudo apt-get install snappy-tools bzr

Alternatively, you can run the Snappy Ubuntu instance locally using any one of the following method.

Run Snappy Ubuntu Core Instance locally using QEMU or KVM

Here, we will see how to run Snappy Ubuntu using QEMU and KVM.

1. Run Snappy Ubuntu locally using KVM

First, Install KVM using command:

sudo apt-get install qemu-kvm

Verify that your hardware can run virtual machines, using command:

kvm-ok

Sample output:

INFO: /dev/kvm exists
KVM acceleration can be used

As you see in the above output, we can run virtual machines in our system using KVM.

Download the Snappy Ubuntu core image using command:

wget http://releases.ubuntu.com/15.04/ubuntu-15.04-snappy-amd64-generic.img.xz

Extract the Snappy archive:

unxz ubuntu-15.04-snappy-amd64-generic.img.xz

That’s it. Now, you can run Snappy Ubuntu using command:

kvm -m 512 -redir :8090::80 -redir :8022::22 ubuntu-15.04-snappy-amd64-generic.img

Once it gives you a login prompt you can either log in directly in the window or SSH to the virtual machine at a local, redirected port (we mapped the SSH port of the VM to a different local port on your laptop):

ssh -p 8022 ubuntu@localhost

The default username and password for Snappy Ubuntu Core is ubuntu/ubuntu.

2. Run Snappy Ubuntu locally using QEMU

First, install QEMU as described in the following link.

Here, I will be using Virtual Machine Manager, a GUI front end tool for QEMU and KVM, to create and run Snappy Ubuntu core virtual machine.

Launch ‘Virtual Machine Manager’ either from Menu or Unity Dash.

It will look like below.

Virtual Machine Manager_001

Go to file File -> New Virtual Machine. Select ‘Import existing image’.

New VM_002

Browse where you have kept the Snappy Ubuntu KVM image.

New VM_003

Enter the RAM size and click Forward.

New VM_004

Enter the OS name and click Finish.

New VM_005

Once you clicked the ‘Finish’ button, the Snappy Ubuntu virtual machine will automatically boot.

Snappy Virtual Machine_006

The default username and password for Snappy Ubuntu Core is ubuntu/ubuntu.

Snappy Virtual Machine_007

Run Snappy Ubuntu Core Instance locally using Hypervisors

Download the latest Snappy virtual hard drive image from here and import to VirtualBox or any other hypervisor as mentioned above.

Of course, you can convert the Snappy KVM image to VirtualBox usable format and import it to VirtualBox.

To convert the Snappy KVM image to VirtualBox VDI format, run the following command:

sudo VBoxManage convertfromraw ubuntu-15.04-snappy-amd64-generic.img ubuntu-15.04-snappy-amd64-generic.vdi --format vdi

Now, Open VirtualBox. Go to Machine -> New.

Enter the Virtual Machine name.

Create Virtual Machine_008

Enter RAM size.

Create Virtual Machine_009

Select “Use an existing virtual hard drive file” and specify the location of the Snappy Ubuntu virtual hard disk file which we have converted from the KVM format.

Create Virtual Machine_013

Finally, start the Snappy Ubuntu Core virtual machine.

Snappy [Running] - Oracle VM VirtualBox_014

Now, login with username ‘ubuntu’ and password ‘ubuntu’.

Snappy [Running] - Oracle VM VirtualBox_015

That’s it. We have setup Snappy Ubuntu Core. In our next tutorial, we will see how to use Snappy Ubuntu Core in more detail.

Cheers!

Reference:

---------------------------------------------------------------------
Snappy Ubuntu Core – An Entirely New Ubuntu Operating System For Clouds And Devices


How To Install Varnish Cache 4.0 In CentOS 7

$
0
0


Varnish Cache is a web application accelerator also known as a caching HTTP reverse proxy. You install it in front of any server that speaks HTTP and configure it to cache the contents. Varnish Cache is really, really fast. It typically speeds up delivery with a factor of 300 – 1000x, depending on your architecture. A high level overview of what Varnish does can be seen in the video attached to this web page.

Steps to install Varnish on CentOS

  • My Centos Server: CentOS Linux release 7.1.1503 (Core) 
  • IP: 192.168.136.131

1. Execute the following command to varnish repo for Centos 7

vi /etc/yum.repos.d/varnish.repo
[varnish-4.0]
 name=Varnish 4.0 for Enterprise Linux
 baseurl=https://repo.varnish-cache.org/redhat/varnish-4.0/el7/$basearch
 enabled=1
 gpgcheck=0
 gpgkey=file:///etc/pki/rpm-gpg/RPM-GPG-KEY-VARNISH
 [root@localhost varnish]#

2. Install EPEL Repo for CentOS 7 

3. Then install varnish using yum command

yum update
[root@localhost ~]# yum install varnish
Loaded plugins: fastestmirror, langpacks
Loading mirror speeds from cached hostfile
 * base: mirror.denit.net
 * epel: ftp.fau.de
 * extras: centos.mirror.transip.nl
 * updates: mirrors.supportex.net
Resolving Dependencies
--> Running transaction check
---> Package varnish.x86_64 0:4.0.3-3.el7 will be installed
--> Processing Dependency: varnish-libs(x86-64) = 4.0.3-3.el7 for package: varnish-4.0.3-3.el7.x86_64
--> Processing Dependency: libvarnishapi.so.1(LIBVARNISHAPI_1.3)(64bit) for package: varnish-4.0.3-3.el7.x86_64
--> Processing Dependency: libvarnishapi.so.1(LIBVARNISHAPI_1.2)(64bit) for package: varnish-4.0.3-3.el7.x86_64
--> Processing Dependency: libvarnishapi.so.1(LIBVARNISHAPI_1.1)(64bit) for package: varnish-4.0.3-3.el7.x86_64
--> Processing Dependency: libvarnishapi.so.1(LIBVARNISHAPI_1.0)(64bit) for package: varnish-4.0.3-3.el7.x86_64
--> Processing Dependency: jemalloc for package: varnish-4.0.3-3.el7.x86_64
--> Processing Dependency: libvgz.so()(64bit) for package: varnish-4.0.3-3.el7.x86_64
--> Processing Dependency: libvcc.so()(64bit) for package: varnish-4.0.3-3.el7.x86_64
--> Processing Dependency: libvarnishcompat.so()(64bit) for package: varnish-4.0.3-3.el7.x86_64
--> Processing Dependency: libvarnishapi.so.1()(64bit) for package: varnish-4.0.3-3.el7.x86_64
--> Processing Dependency: libvarnish.so()(64bit) for package: varnish-4.0.3-3.el7.x86_64
--> Processing Dependency: libjemalloc.so.1()(64bit) for package: varnish-4.0.3-3.el7.x86_64
--> Running transaction check
---> Package jemalloc.x86_64 0:3.6.0-1.el7 will be installed
---> Package varnish-libs.x86_64 0:4.0.3-3.el7 will be installed
--> Finished Dependency Resolution

Dependencies Resolved

=======================================================================================================================
 Package                                               Arch                                            Version
=======================================================================================================================
Installing:
 varnish                                               x86_64                                          4.0.3-3.el7
Installing for dependencies:
 jemalloc                                              x86_64                                          3.6.0-1.el7
 varnish-libs                                          x86_64                                          4.0.3-3.el7

Transaction Summary
=======================================================================================================================
Install  1 Package (+2 Dependent packages)

4. Edit the Varnish configuration under /etc/varnish 

Edit varnish

vi  varnish.params
# Default address and port to bind to. Blank address means all IPv4
# and IPv6 interfaces, otherwise specify a host name, an IPv4 dotted
# quad, or an IPv6 address in brackets.
# VARNISH_LISTEN_ADDRESS=192.168.1.5
VARNISH_LISTEN_PORT=80

# Admin interface listen address and port
VARNISH_ADMIN_LISTEN_ADDRESS=192.168.136.131
VARNISH_ADMIN_LISTEN_PORT=6082

and Edit default.vcl

# Default backend definition. Set this to point to your content server.
backend default {
    .host = "192.168.136.131";
    .port = "8080";
}

Edit   apache  configuration  and  change    listen port  to  8080

 vi  /etc/httpd/conf/httpd.conf
Listen 8080

5. Edit firewall to allow the http service

[root@localhost varnish]# systemctl stop firewalld
[root@localhost varnish]# systemctl status firewalld
firewalld.service - firewalld - dynamic firewall daemon
   Loaded: loaded (/usr/lib/systemd/system/firewalld.service; enabled)
   Active: inactive (dead) since Mon 2015-06-01 15:32:19 PDT; 53min ago
 Main PID: 758 (code=exited, status=0/SUCCESS)
   CGroup: /system.slice/firewalld.service

Jun 01 13:38:39 localhost.localdomain systemd[1]: Started firewalld - dynamic firewall daemon.
Jun 01 15:32:18 localhost.localdomain systemd[1]: Stopping firewalld - dynamic firewall daemon...
Jun 01 15:32:19 localhost.localdomain systemd[1]: Stopped firewalld - dynamic firewall daemon.
Hint: Some lines were ellipsized, use -l to show in full.
[root@localhost varnish]#

if you want to keep the firewall running:

# firewall-cmd --permanent --zone=internal --add-service=http
success
# firewall-cmd --reload
success

 6. Enable and start Varnish and Apache daemons

systemctl enable varnish
systemctl enable httpd
systemctl start varnish
systemctl start httpd

7. check if apache running

http://ip  http://hosnmae

8. Now check if you caching system working  

varnish

Or check from the command line as shown below.

[root@localhost varnish]# curl -I 192.168.136.131
 HTTP/1.1 403 Forbidden
 Date: Mon, 01 Jun 2015 23:03:10 GMT
 Server: Apache/2.4.6 (CentOS) PHP/5.4.16
 Last-Modified: Thu, 16 Oct 2014 13:20:58 GMT
 ETag: "1321-5058a1e728280"
 Accept-Ranges: bytes
 Content-Length: 4897
 Content-Type: text/html; charset=UTF-8
 X-Varnish: 32779
 Age: 0
 Via: 1.1 varnish-v4
 Connection: keep-alive

 That’s it.

---------------------------------------------------------------------
How To Install Varnish Cache 4.0 In CentOS 7

Getting Started With Snappy Ubuntu Core

$
0
0


In our previous article, we discussed what is Snappy Ubuntu Core, and how to install it. If still haven’t read that guide and don’t know what is Snappy Ubuntu Core, read the following article.

Today, In this tutorial, let us see how to getting started with Snappy Ubuntu Core.

Snappy Ubuntu Core Usage

Log in to your Snappy Ubuntu Core system. The default username and password is ubuntu/ubuntu.

Or you can SSH from a remote system with command:

ssh ubuntu@<IP-address-of-snappy>

1. Check Snappy Ubuntu Core version

Let us check Snappy Core version first.

To do that, run:

snappy info

Sample output:

release: ubuntu-core/15.04/stable
architecture: amd64
frameworks: 
apps: webdm

Well, as you see in the above output, the version of Snappy Ubuntu Core is 15.04 stable, and its arch is 64bit. Since it is a fresh system, it has no frameworks and only one app called “webdm”.

2. Viewing Installed applications

To list all installed apps with version, run:

snappy list -v

Sample output:

Name          Date       Version Developer 
ubuntu-core   2015-04-23 2       ubuntu*   
webdm         2015-04-23 0.5     sideload* 
generic-amd64 2015-04-23 1.1     *

The asterisk (*) tells you that this version of the component is what is currently running. If you do an update, you will get the newer version of the system to be active when you reboot.

Let us see see if there is an updated system. The update‐versions command will check the store for newer versions of any installed components. If you are fully up to date, you will see the same versions listed which are currently installed.

To check if there is an updated system, run:

snappy list -uv

Sample output:

Name           Date       Version 
ubuntu-core    2015-04-23 2       
webdm*         1-01-01    0.8     
generic-amd64* 1-01-01    1.1.1

As you above, we had two updates. The updated versions are marked with active flag(*).

Let us go ahead and update them using command:

sudo snappy update

Sample output:

Installing webdm (0.8)
Starting download of webdm
6.16 MB / 6.16 MB [======================================] 100.00 % 246.20 KB/s 
Done
Installing generic-amd64 (1.1.1)
Starting download of generic-amd64
40.93 KB / 40.93 KB [=====================================] 100.00 % 81.89 KB/s 
Done
Name          Date    Version Developer 
webdm         1-01-01 0.8     canonical 
generic-amd64 1-01-01 1.1.1   canonical

Again, run  the following command to check if there is any updates.

snappy list -uv

Sample output:

Name          Date       Version 
ubuntu-core   2015-04-23 2       
webdm         2015-06-03 0.8     
webdm         2015-04-23 0.5     
generic-amd64 2015-06-03 1.1.1

See, the webdm and generic-amd64 have been updated to the latest available version.

If you update the Ubuntu Core, you must restart to apply the changes. To reboot Snappy Ubuntu Core, Run:

sudo reboot

3. Roll back applications or frameworks

Also, we can roll back to the previous version if needed. This is the useful feature of Snappy. To roll back any application, for example generic-amd64, run:

sudo snappy rollback generic-amd64

Sample output:

Setting generic-amd64 to version 1.1

To verify the changes, run:

snappy list -v

Sample output:

Name          Date       Version Developer 
ubuntu-core   2015-04-23 2       ubuntu*   
webdm         2015-06-03 0.8     *         
webdm         2015-04-23 0.5     sideload* 
generic-amd64 2015-04-23 1.1     *         
generic-amd64 2015-06-03 1.1.1

As you see above, the generic-amd64 package shows two versions here, 1.1 and 1.1.1. The asterik (*) beside 1.1.1 shows that this is the one that is actively used.

4. Installing applications and frameworks

Well, now we will see how to install new applications and frameworks.

snappy frameworks are somewhat different from the Ubuntu for Phones click frameworks and are more flexible. Most importantly, click frameworks for Ubuntu for Phones map to a particular release and are contracts between the platform (OS) and apps. Snappy splits out the platform (OS) and the framework such that the contract is split between the framework and the platform release (OS) (the release and installed frameworks can be seen via snappy info). As such, apps will specify the release they target (implementation covered elsewhere) and any frameworks they require.

To search all available applications, run:

snappy search

Sample output:

Name                     Version            Summary                          
beagle.gumstix           0.1                beagle                           
duovero.gumstix          0.1                duovero                          
xkcd-webserver           0.5                xkcd-webserver                   
system-status.victor     1.0.3              System status web portal         
overo.gumstix            0.1                overo                            
mosquitto.kartben        1.4.2.201505120017 Mosquitto                        
webcam-demo              1.0.1              webcam-demo                      
pi2.lool                 0.11               pi2                              
snake.mectors            0.0.5              Snake                            
pepper.gumstix           0.1                pepper                           
panda.gumstix            0.1                panda                            
hello-dbus-fwk.canonical 1.0.0              hello-dbus-fwk                   
docker                   1.6.1.002          Docker                           
generic-amd64            1.1.1              generic-amd64                    
hello-world              1.0.15             hello-world (forks not shown: 1) 
chatroom.ogra            0.1-8              Snappy Chatroom                  
computexintel.mectors    0.0.3              Computex Intel                   
crossbar.crossbar        0.10.4             Crossbar.io                      
webdm                    0.8                webdm                            
beagleblack              1.7.1              beagleblack                      
go-example-webserver     1.0.7              go-example-webserver             
config-example           1.0.6              config-example                   
pastebinit.mvo           1.4.0.0.2          pastebinit                       
Use --show-all to see all available forks.

You can search for a particular apps or frameworks as shown below.

snappy search webserver

Sample output:

Name                 Version Summary                  
go-example-webserver 1.0.7   go-example-webserver     
xkcd-webserver       0.5     xkcd-webserver           
system-status.victor 1.0.3   System status web portal

Let me show you how to install a package.

To install an application, for example docker, run:

sudo snappy install docker

Sample output:

Installing docker
Starting download of docker
8.36 MB / 8.36 MB [=======================================] 100.00 % 99.96 KB/s 
Done
Name          Date       Version   Developer 
ubuntu-core   2015-04-23 2         ubuntu    
docker        2015-06-03 1.6.1.002           
webdm         2015-06-03 0.8                 
webdm         2015-04-23 0.5       sideload  
generic-amd64 2015-06-03 1.1.1

Remember there is no ‘apt-get’ or ‘aptitude’ or ‘dpkg’ commands in Snappy Core. If you try to install, remove or update any package using apt-get method, you will get the following error.

Ubuntu Core does not use apt-get, see 'snappy --help'!

Now, let us check if the docker application has installed or not. To do that, run:

snappy list

Sample output:

Name          Date       Version   Developer 
ubuntu-core   2015-04-23 2         ubuntu    
docker        2015-06-03 1.6.1.002           
webdm         2015-06-03 0.8                 
webdm         2015-04-23 0.5       sideload  
generic-amd64 2015-06-03 1.1.1

As you see in the above output, Docker has been installed.

5. Removing applications and frameworks

Similarly, you can install as many as applications you want. To remove an installed application, for example docker, run:

sudo snappy remove docker

Sample output:

Removing docker
Waiting for docker_docker-daemon_1.6.1.002.service to stop.

Check if docker is really removed or not using command:

snappy list

Sample output:

Name          Date       Version Developer 
ubuntu-core   2015-04-23 2       ubuntu    
webdm         2015-06-03 0.8               
webdm         2015-04-23 0.5     sideload  
generic-amd64 2015-06-03 1.1.1

See, Docker is no more now in Snappy core.

To completely remove all the data from the listed packages, run:

sudo snappy purge docker

To view more details about Snappy commands, run:

snappy --help

Sample output:

Usage:
  snappy [OPTIONS] <command>

Help Options:
  -h, --help  Show this help message

Available commands:
  booted              Flag that rootfs booted successfully
  build               Builds a snap package (aliases: bu)
  config              Set configuraion for a installed package.
  firstboot           internal
  hw-assign           Assign a hardware device to a package
  hw-info             List assigned hardware device for a package
  hw-unassign         Unassign a hardware device to a package
  info                Display a summary of key attributes of the snappy system.
  install             Install a snap package
  internal-run-hooks  internal
  internal-unpack     internal
  list                List active components installed on a snappy system (aliases: li)
  login               Log into the store
  purge               Remove all the data from the listed packages
  remove              Remove a snapp part
  rollback            Rollback to a previous version of a package
  search              Search for packages to install (aliases: se)
  set                 Set properties of system or package
  update              Update all installed parts
  versions            (deprecated) please use "list"

There is no man pages for Snappy commands right now. I hope Snappy developers is working on it.

Also, there is more online guides are available in Snappy official documentation page. Go and refer them if you need to learn more about Snappy.

Once you have finished, power off the Snappy Core using command:

sudo poweroff

Conclusion

Working with Snappy Ubuntu Core is pretty easy. Be you’re a normal user, developer or a system administrator, you don’t have worry about the Snappy commands. All Snappy commands are really easy to remember and use. Snappy provides a new approach to package management, improved security, simplifying tasks. The installation is really fast. And everything is available as a single package, so there is no dependencies errors or broken system. Let us welcome this new baby from Canonical and appreciate the developers efforts to make it possible.

Cheers!

---------------------------------------------------------------------
Getting Started With Snappy Ubuntu Core

Some Basic Linux Commands I Have Used During My Linux Journey – Part 4

$
0
0


My linux journey has been great so far. I have learned so many commands that I feel a bit of a little ninja sometimes, but to be honest I am far from that. The more I use linux the more I understand that I don’t know much stuff about it.

You might want to check the previous parts of this series.

Many of you guys are interested in learning new commands and becoming more practical when it comes to the commandline, are you ready for some other commands?

The tail command

The tail command is very easy to use as the only thing you will need while using this utility is the name of the filename you want to output on the standard output, but in difference from cat it does not display the entire file, only the last parts of it.

The following example shows how to use the tail utility.

tail text.txt

The above command is going to print the last ten lines of the test.txt file on the standard output. Thee are also many other options that you can use with the tail utility such as the -c option which can be used to speficy the last K bytes you want to print to stdout, –retry to keep trying in case opening a file fails, -n to output the last K lines etc.

The nc command

nc is a great commandline utility which is being referred as the TCP/IP swiss army knife. It has been in the field for more than 20 years I think but its power has made it last so far. I find this small utility very useful when I want to debug stuff I code.

nc can be used both as a server and as a client. To do that you have to put the nc on the mode you want to use it.

For example if you would like to create a listener on your machine at a specific port you have to specify the port and the mode which in this case is listening.

The nc -l command puts nectat in listen mode.Run this command on your machine’s console and see what happens. If you want to learn new stuff you should keep trying and experimenting.

The following command puts netcat on listening mode and tell it to listen on port 13. Port numbers can be individual or ranges.

nc -l -p 13

You can also hex dump of traffic by using the -o option followed by the file where you want to do it. Do you like to create a simple chat with netcat? I am very sure it will make learning more interesting for you.

Lets do it.

Run netcat with the ‘-l’ option in order to operate in listening mode. You should also specify the listening port, I prefer 1300.

nc -l -p 1300

Then, run another ‘netcat’ which will initiate the connection by connecting to the server.

nc localhost 1300

Start chatting now by typing text in both parts. I mean in the netcat client and netcat server.

Be careful when using netcat. Do not allow people that can do malicious stuff to your machine. A very dangerous option that is supported by netcat is the -c option which is being used to specify specify shell commands in string format to exec after connection has taken place.

The apt-get install command

This command is debian specific. Ubuntu users use this command all the time to install new packages on their computers. For example to install nmap on my machine I just run the following command.

sudo apt-get install nmap

The apt-get install command takes care of the package dependencies for me, so the only thing I have to do while installing software with it is just type y when needed and drink some coffee while software downloads.

The apt-get autoremove command

The apt-get autoremove command is used to remove packages that were installed on your machine and are no longer required. Everything is done automatically, no need to specify the packages you want to remove as this is the purpose of this command.

sudo apt-get autoremove

Running the above command on my Ubuntu machine gives me the following output on the console.

 Reading package lists... Done
 Building dependency tree
 Reading state information... Done
 The following packages will be REMOVED:
 radiance-materials tcsh
 0 upgraded, 0 newly installed, 2 to remove and 379 not upgraded.
 After this operation, 14.4 MB disk space will be freed.
 Do you want to continue [Y/n]?

As you guys can see the above command reads the packages list, builds the dependency tree and informs the user about the packages that will be removed. If you want to continue just type the Y and hit return on your keyboard.

The cd ..

This command is very useful when you want to go back on directory. For example If I am working on the projects/pyproject/base and want to cd back to the pyproject I just run the following command inside the current working directory.

cd ..

The cd ../ command

There will be cases when you want to navigate back on your directories, but not just one so the cd .. comand is not useful in this case.

To do that use the cd ../ command. Let me show you guys a very simple example in order to make things practical for you.

First let me run the pwd command to print the current working directory on my console.

pwd

I get the following output.

/home/oltjano/Desktop

To go to the home directory I do the following.

cd ../../

Doing pwd command again prints the following.

/home

The whereis command

The whereis command can be used to locate the binary, source, and manual page files for a command. The usage is as simple as running the above command.

whereis ls

The above command locates binaries and manual pages for the ls command. Let me run it on my terminal and show you guys the output of this command.

After running the above command I get the following standard output on my console.

ls: /bin/ls /usr/share/man/man1/ls.1.gz

What does the above output mean? It is easy to understand if you know the location of the linux commands such as ls, pwd etc. It tells the user that the ls command binary is located in /bin/ls and the manual page is located in /usr/share/man/man1/ls.1.gz.

Why don’t you try it yourself now?

whereis pwd

Then try this.

whereis whereis

Then the following,

whereis cd

When running the above command I get the following output.

whereis: /usr/bin/whereis /usr/bin/X11/whereis /usr/share/man/man1/whereis.1.gz

Rename files with mv command

The mv command becomes very useful when you want to rename files. For example see the command shown below.

mv test.txt test13.txt

The above command changes the name of the test.txt file to test13.txt. You can also use the mv command to move files in different directories.

The more command

The more command helps to view the contents of a file by paging through text one screenful at a time. And to make it more practical to you guys try the following command.

more /etc/profile

The man command

The man command is a great tool that helps the user to learn about different commands, their options, different examples and how to use them. A manual page consists of the following sections:

  • NAME
  • SYNOPSIS
  • CONFIGURATION
  • DESCRIPTION
  • OPTIONS
  • EXIT STATUS
  • RETURN VALUE
  • ERRORS
  • ENVIRONMENT
  • FILES
  • VERSIONS
  • CONFORMING TO
  • NOTES
  • BUGS
  • EXAMPLE
  • AUTHORS
  • SEE ALSO

Every time I want to learn about a new command i reference to its manual page, to do that use the following syntax.

man command-name-here

You can also lookup the manual pages referenced by an item and print out the short descriptions of any found. If you want to do this use the following syntax.

man -f ls

The above command prints the following output.

ls (1) - list directory contents

And last but not least, use the following command to read more about the man command.

man man

Conclusion

You have learned many linux commands so  far. Do you know how to list files? Do you know how to ssh to a server? Do you know how to create a directory with the mkdir command? Do you know how to print the current working directory? Do you know how to copy files? If yes then good for you!

---------------------------------------------------------------------
Some Basic Linux Commands I Have Used During My Linux Journey – Part 4

Install Unity 8 Desktop Preview With Mir Display Server In Ubuntu

$
0
0


As you may already know, Unity 8 desktop session with Mir display server is currently being used in Ubuntu touch devices, and sooner or later it’s going to be a default desktop environment with Mir display server in the upcoming versions of Ubuntu desktop.

Now, the good news is Canonical made it possible to install and test the latest Unity 8 desktop with Mir display server in all Ubuntu desktops just by adding a PPA and installing them. The Unity 8 Desktop Preview in LXC is the new Unity 8 desktop shell running on the Mir display technology using an LXC container. It is just preview version, because it is still development stage and is not ready for production use. Anyone who interested to try Unity 8 desktop experience in the current Ubuntu releases can try and test this.

Excited to try Unity 8 desktop session? Follow me.

Install Unity 8 desktop preview with Mir

There are two ways to run Unity 8 on Ubuntu. One is download the Unity 8 desktop ISO from here, and burn it to a DVD or a USB drive, and install it.

And, the another easy way is to add the PPA developed by Canonical development team through LXC Containers and install it.

In this tutorial, let us see how to install and test Unity 8 desktop preview with Mir display server in any supported Ubuntu OS.

Run the following commands to install and test Unity 8 desktop (preview) in an LXC on Ubuntu 12.04, 14.04, 14.10, 15.04, and 15.10.

It’s currently in the archives for Utopic (14.10) and Vivid (15.04) and Wily (15.10), but the ppa version should be used to ensure the latest version.

First add the Unity 8 PPA using command:

sudo apt-add-repository ppa:unity8-desktop-session-team/unity8-preview-lxc

Then, update the software repository lists.

sudo apt-get update
sudo apt-get upgrade

Now, install Unity 8 desktop preview using command:

sudo apt-get install unity8-lxc

The above command will install slightly modified version of lightdm that works allows the lxc container login. A reboot is required in order to load the upgraded LightDM.

Finally, setup Unity 8 desktop with command:

sudo unity8-lxc-setup

This will download Unity 8 Desktop Preview ISO image and extracts it. It will take a while depending upon your Internet connection speed.

#################### 100.0% 166.4 kBps DONE     

open: No such file or directory
not using seed file /var/lib/lxc/unity8-lxc/ubuntu-next.iso
Read /var/lib/lxc/unity8-lxc/ubuntu-next.iso. Target 0.0% complete.      
No relevent local data found - I will be downloading the whole file. If that's not what you want, CTRL-C out. You should specify the local file is the old version of the file to download with -i (you might have to decompress it with gzip -d first). Or perhaps you just have no data that helps download the file
downloading from http://cdimage.ubuntu.com/ubuntu-desktop-next/daily-live/current/wily-desktop-amd64.iso:
-------------------- 0.0% 8.6 kBps         
-------------------- 4.6% 5.7 kBps         ETA   
######-------------- 34.7% 8.6 kBps         ETA   
########------------ 43.6% 9.6 kBps         ETA   
########------------ 43.6% 10.0 kBps         
#################### 100.0% 229.6 kBps DONE      

verifying download...checksum matches OK
used 0 local, fetched 1086259545
Unpacking the ISO image...
Configuring the Unity8 LXC...
dget: retrieving http://archive.ubuntu.com/ubuntu/pool/main/u/upstart/upstart-sysv_1.13.2-0ubuntu14_amd64.deb
--2015-06-04 18:36:47--  http://archive.ubuntu.com/ubuntu/pool/main/u/upstart/upstart-sysv_1.13.2-0ubuntu14_amd64.deb
Resolving archive.ubuntu.com (archive.ubuntu.com)... 91.189.91.15, 91.189.92.201, 91.189.91.24, ...
Connecting to archive.ubuntu.com (archive.ubuntu.com)|91.189.91.15|:80... connected.
HTTP request sent, awaiting response... 200 OK
Length: 40290 (39K) [application/x-debian-package]
Saving to: ‘upstart-sysv_1.13.2-0ubuntu14_amd64.deb’

upstart-sysv_1.13.2-0ubuntu14_amd64.deb   100%[=======================================================================================>]  39.35K  95.4KB/s   in 0.4s   

2015-06-04 18:36:49 (95.4 KB/s) - ‘upstart-sysv_1.13.2-0ubuntu14_amd64.deb’ saved [40290/40290]

Starting the container
Switching to upstart...
.
.
.

After downloading and installing it, reboot your system.

Log in to Unity 8 desktop session

The Unity 8 Desktop Preview LXC session is like any other desktop session you may have installed on your machine. You gain access to the session through LightDM. At the LightDM login screen, choose the ‘Unity 8 in LXC’ session for your user.

Selection_003

Ubuntu 15.04 Desktop [Running] - Oracle VM VirtualBox_001

Be mindful that Guest sessions are not yet supported. Unity8 may take several seconds to load, but eventually you should be greeted with the familiar unity8 lockscreen.

To switch back to the previous Unity session, just log out and select the ‘Ubuntu default’ from the LightDM screen.

Update Unity 8

Currently, the Updater inside the Unity 8 session does not fully work on updating the packages in the LXC. The unity8-lxc-setup utility has functionality in it to update the packages in the LXC.

To update the contents of LXC, run:

sudo unity8-lxc-setup --update-lxc

Please note that, the above command will just updates the packages already in the LXC and does not necessarily have what is contained on the latest Unity 8 Desktop Preview ISO.

If you’ve already installed the Unity 8 Desktop Preview ISO and would like to use the latest ISO instead, run:

sudo unity8-lxc-setup --rebuild-all --redownload

Sample output:

#################### 100.0% 153.9 kBps DONE     

reading seed file /var/lib/lxc/unity8-lxc/ubuntu-next.iso: *****************************************************************************************************************************************************************************************************************************************************************************************************************************************************************************************************************************************************************************************************************************************************************************************************************************************************************************************************************************************************************************************************************************************************************************************************************************************************************************************************************************************************************************************************Read /var/lib/lxc/unity8-lxc/ubuntu-next.iso. Target 100.0% complete.      
verifying download...checksum matches OK
used 1086259200 local, fetched 0
Unpacking the ISO image...
Configuring the Unity8 LXC...
dget: retrieving http://archive.ubuntu.com/ubuntu/pool/main/u/upstart/upstart-sysv_1.13.2-0ubuntu14_amd64.deb
--2015-06-04 19:12:36--  http://archive.ubuntu.com/ubuntu/pool/main/u/upstart/upstart-sysv_1.13.2-0ubuntu14_amd64.deb
Resolving archive.ubuntu.com (archive.ubuntu.com)... 91.189.92.201, 91.189.92.200, 91.189.91.14, ...
Connecting to archive.ubuntu.com (archive.ubuntu.com)|91.189.92.201|:80... connected.
HTTP request sent, awaiting response... 200 OK
Length: 40290 (39K) [application/x-debian-package]
Saving to: ‘upstart-sysv_1.13.2-0ubuntu14_amd64.deb’

upstart-sysv_1.13.2 100%[=====================>]  39.35K  85.7KB/s   in 0.5s   

2015-06-04 19:12:37 (85.7 KB/s) - ‘upstart-sysv_1.13.2-0ubuntu14_amd64.deb’ saved [40290/40290]

Starting the container
Switching to upstart...
Reading package lists... Done
Building dependency tree       
Reading state information... Done
The following packages will be REMOVED:
  systemd-sysv ubuntu-standard
The following NEW packages will be installed:
  upstart-sysv
0 upgraded, 1 newly installed, 2 to remove and 0 not upgraded.
Need to get 0 B/40.3 kB of archives.
After this operation, 56.3 kB of additional disk space will be used.
(Reading database ... 125304 files and directories currently installed.)
Removing ubuntu-standard (1.334) ...
dpkg: systemd-sysv: dependency problems, but removing anyway as you requested:
 init depends on systemd-sysv | upstart-sysv; however:
  Package systemd-sysv is to be removed.
  Package upstart-sysv is not installed.

Removing systemd-sysv (219-10ubuntu1) ...
Processing triggers for man-db (2.7.0.2-5) ...
Selecting previously unselected package upstart-sysv.
(Reading database ... 125284 files and directories currently installed.)
Preparing to unpack .../upstart-sysv_1.13.2-0ubuntu14_amd64.deb ...
Unpacking upstart-sysv (1.13.2-0ubuntu14) ...
Processing triggers for man-db (2.7.0.2-5) ...
Setting up upstart-sysv (1.13.2-0ubuntu14) ...

Remove Unity 8

As I mentioned above, Unity 8 with Mir display is not yet completely ready. you may end up with broken system. I strongly suggest you to try in a fresh system. Since it is in heavy development stage, some propriety display drivers like AMD or Nvidia do not work as expected. But, don’t worry the developers are hardly working to make it perfect for all drivers and devices. If you want to test and review how the Unity 8 stack works in the desktop experience with an eye to full Ubuntu convergence, give it a try.

If you found any issues, file the bug against unity8-desktop-session.

To remove Unity 8, simply run:

sudo apt-get remove unity8-lxc

That’s all for now. We will keep you updated from time to time about Unity 8. Till then, stay tuned with us and stay happy.

Cheers!

---------------------------------------------------------------------
Install Unity 8 Desktop Preview With Mir Display Server In Ubuntu

Some Basic Linux Commands I Have Used During My Linux Journey – Part 5

$
0
0


Maybe you thought that the number of commands in the linux operating system would come to an end in the fourth part of this series, but it did not. There are many others I have learned while working on the linux commandline.

You might want to read our previous parts of this series.

The date command

The date command is used to display the system date on standard output. Open a new terminal console on your linux machine and run the following command.

date

Depending on the day you run it you should get a different output. I get the following.

Thu Jun 4 12:53:57 CEST 2015

Not only we get information about the date when using the date command but we also learn the correct time in the zone of our system. And of course the year too.

You can also output the date in  RFC 2822 format by using the -R option with the date command like shown in the following example which is being run on my machine.

date -R

When using the above command you should get an output similar to the following. I mean the same format.

Thu, 04 Jun 2015 13:00:45 +0200

The lsusb command

The lsusb command as the name suggests is used to list usb devices on your system. According to its manual page it displays information about USB buses in the system and the devices connected to them.

Running the following command just lists the USB buses on my system. It does not give me a detailed information but is useful when I want to know what devices are connected to them.

lsusb

And the output of the above command is shown below.

 Bus 001 Device 002: ID 8087:0024 Intel Corp. Integrated Rate Matching Hub
 Bus 002 Device 002: ID 8087:0024 Intel Corp. Integrated Rate Matching Hub
 Bus 001 Device 001: ID 1d6b:0002 Linux Foundation 2.0 root hub
 Bus 002 Device 001: ID 1d6b:0002 Linux Foundation 2.0 root hub
 Bus 003 Device 001: ID 1d6b:0002 Linux Foundation 2.0 root hub
 Bus 004 Device 001: ID 1d6b:0003 Linux Foundation 3.0 root hub
 Bus 001 Device 005: ID 1bcf:2883 Sunplus Innovation Technology Inc.

A more detailed output is displayed using the -v option which stands for verbose output. When using this option you will also get information on the descriptors for the device’s speed.

Run the following command on your system.

lsusb -v

The output of the above command is going to be very long so I am not going to post it in here. You should try the command and study it yourself for further learning or advancing your skills.

The arch command

The arch command can be very useful when you want to show the architecture of your machine on standard output. If you have ever used uname -a then you understand the purpose of the arch command then.

Run the following command to print the machine hardware name.

arch

And I get the following output.

x86_64

To find the version of the arch utility being used you can use the –version long option like shown in the following example.

arch --version

When running the above command I get the following output.

 arch (GNU coreutils) 8.13
 Copyright (C) 2011 Free Software Foundation, Inc.
 License GPLv3+: GNU GPL version 3 or later <http://gnu.org/licenses/gpl.html>.
 This is free software: you are free to change and redistribute it.
 There is NO WARRANTY, to the extent permitted by law.
 Written by David MacKenzie and Karel Zak.

To get help while using the arch command then use the –help long option like shown in the following example.

arch --help

The following output is displayed on my console when  running the above command.

 Usage: arch [OPTION]...
 Print machine architecture.

 --help display this help and exit
 --version output version information and exit

 Report arch bugs to bug-coreutils@gnu.org
 GNU coreutils home page: <http://www.gnu.org/software/coreutils/>
 General help using GNU software: <http://www.gnu.org/gethelp/>
 For complete documentation, run: info coreutils 'arch invocation'

Unfortunately the arch tool does not support other options.

The cal command

The cal command is used to display a simple calendar on the standard output. To show a calendar on your console just run the following command.

cal

And you should a get nicely traditional calendar which highlights the current date. Mine is shown below.

 June 2015
 Su Mo Tu We Th Fr Sa
 1 2 3 4 5 6
 7 8 9 10 11 12 13
 14 15 16 17 18 19 20
 21 22 23 24 25 26 27
 28 29 30

To turn off highlighting of today which is on by default then you should use the -h option like shown in the following example.

cal -h

Now you will not get the today highlighted, I mean anytime you run the above command.

Use the -y option to display the calendar for a specific year.

cal -y 2016

The above command will display the all calendar for the year 2016.

The file command

The file command is used to determine what a file contains before you view it. In short words when using the file command it will examine the file for you and tell its kind. As an example take the following command shown below.

file test.txt

Running the above command on my system gives me the following output.

test.txt: ASCII text

And if you would like to output mime strings rather than traditional ones then use the -i option like shown below.

file -i test.txt

I get the following output.

test.txt: text/plain; charset=us-ascii

You can also print specific elements out of the long mime string. For example to print the mime type run the following command.

file --mime-type test.txt

I get the following output when running the above command.

test.txt: text/plain

What about printing out the mime encoding? It is very simple! The –mime-encoding can be used in this case like shown in the following example.

file --mime-encoding test.txt

Whe running the above command I get the following output.

test.txt: us-ascii

To learn more about the file command  you know what to do. In case you don’t just run the following command.

man file

The ls /bin command

I am sure you know about the ls command. It is used to list the files inside a directory. The ls /bin command can be used to list the files inside the /bin directory of your system.

The ls -l /bin command

The ls -l /bin command lists the files inside the bin directory in the long format. The -l option stands for long output which is very useful to use when you want detailed stuff.

The hdparm -i /dev/sda command

The hdparm -i /dev/sda command is used to show information about the disk /dev/sda. Run the following command on your console to get a better understanding.

hdparm -i /dev/sda

I get the following output when running the above command.

 /dev/sda:
 Model=ST9500325AS, FwRev=0005HPM1, SerialNo=5VE436TP
 Config={ HardSect NotMFM HdSw>15uSec Fixed DTR>10Mbs RotSpdTol>.5% }
 RawCHS=16383/16/63, TrkSize=0, SectSize=0, ECCbytes=4
 BuffType=unknown, BuffSize=8192kB, MaxMultSect=16, MultSect=16
 CurCHS=16383/16/63, CurSects=16514064, LBA=yes, LBAsects=976773168
 IORDY=on/off, tPIO={min:120,w/IORDY:120}, tDMA={min:120,rec:120}
 PIO modes: pio0 pio1 pio2 pio3 pio4
 DMA modes: mdma0 mdma1 mdma2
 UDMA modes: udma0 udma1 udma2 udma3 udma4 *udma5
 AdvancedPM=yes: unknown setting WriteCache=enabled
 Drive conforms to: unknown: ATA/ATAPI-3,4,5,6,7
 * signifies the current active mode

The head -n1 /etc/issue command

The head -n1 /etc/issue command is used to show the name and the version of distribution which powers your linux machine. Running this command on my system like shown below gives me some nice information about the Ubuntu version I am using.

head -n1 /etc/issue

And the name and version of the machine being used is shown below.

Ubuntu 12.04.4 LTS \n \l

The last reboot command

If you want to know the date and time of the last reboot of your machine then you should use the following command.

last reboot

When running the above command I get the following output.

wtmp begins Tue Jun 2 03:04:39 2015

The free command

The free command is used to display the amount of free and used memory on your system. For example to display information on my used and free ram I just use the free command like shown below.

free

And I get a nice readable output like shown below.

 total used free shared buffers cached
 Mem: 3929724 3708236 221488 0 44712 1947924
 -/+ buffers/cache: 1715600 2214124
 Swap: 0 0 0

To make it human readable make use of the -m option which is being used to display the amount of ram in MB.

free -m

And the output produced by the above command is very human readable. It is shown below.

 total used free shared buffers cached
 Mem: 3837 3627 209 0 43 1913
 -/+ buffers/cache: 1670 2167
 Swap: 0 0 0

Conclusion

In this part we took a look at some very practical linux commands I have learned all this time as a linux user. In the next part I will compile and explain some new useful commands for you guys.

---------------------------------------------------------------------
Some Basic Linux Commands I Have Used During My Linux Journey – Part 5

Viewing all 1264 articles
Browse latest View live